Training type: User Guide
GP Reimbursement Scheme – Commissioner User Guide
What happens if a change is made after an Achievement has been Declared in the Network Contract DES Service?
Purpose of this guide
This guide walks through functionality in CQRS for the Network Contract DES (NCD) service that ensures that any declarations reflect the most up-to-date achievement figures, even if changes occur after an initial declaration request. These updates ensure accuracy and clarity when:
- A practice joins or leaves a PCN (Primary Care Network)
- Data is amended at indicator level
Topics Covered
- Updated Achievement After Re-calculation
What users will see when achievement values need to be recalculated
2. Practice Joins or Leaves a PCN After Calculation
What users will see when a practice has joined or left a PCN after the calculation has been run.
3. Payment Declaration Following Financial Approval
What users will see once payment declarations have been financially approved.
1. Updated Achievement After Re-calculation
Payment declaration requested – Achievement data awaiting reaggregation
If the Service Provider user clicks the Declare Achievement button but there is achievement waiting to be aggregated the below message is returned.
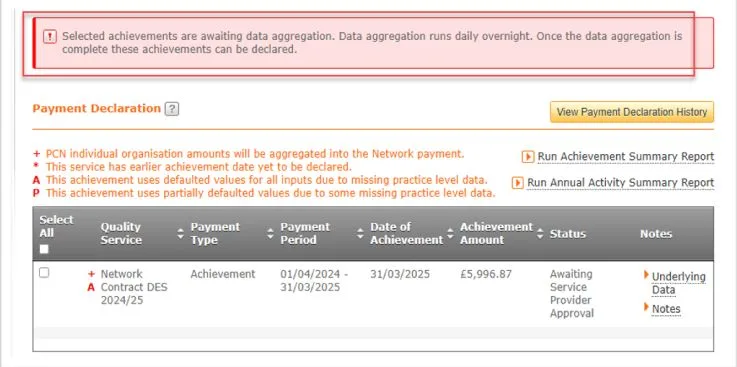

Note: Data reaggregation runs daily overnight to ensure that achievement data cannot be declared based on incorrect values until all the data, including the new submitted values, have been reaggregated.
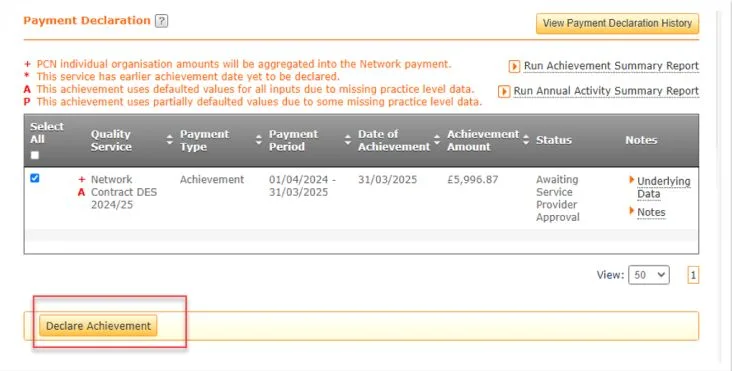
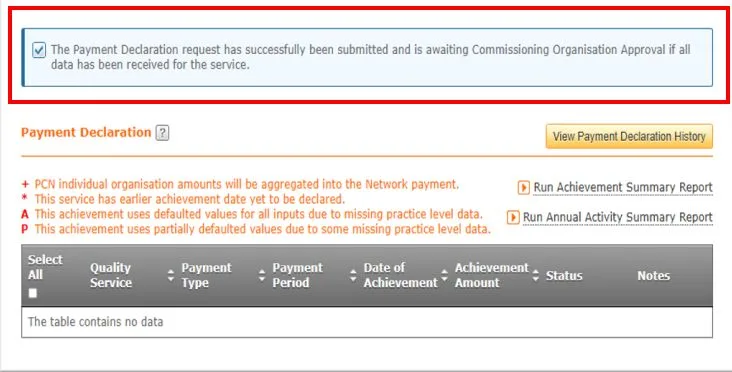
Payment declaration requested – Awaiting Commissioning Organisation Approval
If achievement was recalculated overnight due to changes, the achievement will revert back to Awaiting Service Provider Approval and can then be re-declared by the PCN and the status will then move to Awaiting Commissioning Organisation Approval.
Note: Data reaggregation runs daily overnight to ensure that achievement data cannot be declared based on incorrect values until all the data, including the new submitted values, have been reaggregated.
Payment declaration requested- For multiple achievements, though one or more are still pending data aggregation
If declaration is attempted for multiple achievements but one or more of those achievements are awaiting aggregation the below message will be displayed.
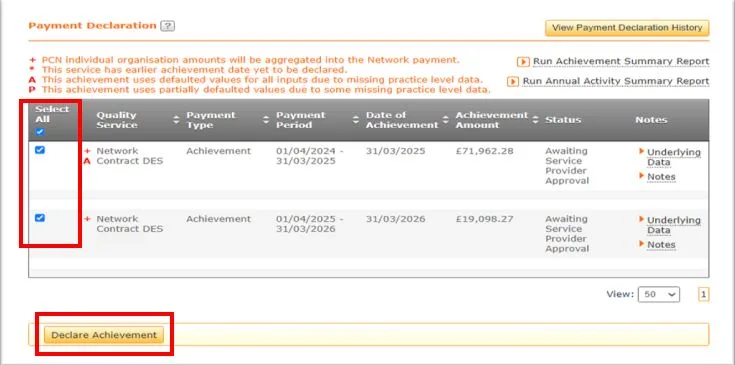
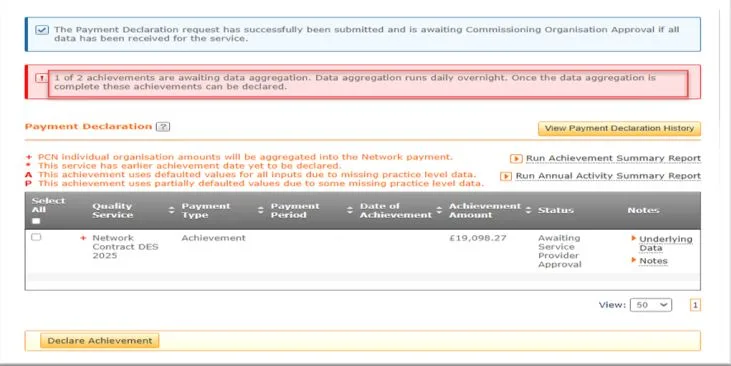
Note: Data reaggregation runs daily overnight to ensure that achievement data cannot be declared based on incorrect values until all the data, including the new submitted values, have been reaggregated.
2. Practice Joins or Leaves a PCN After Calculation
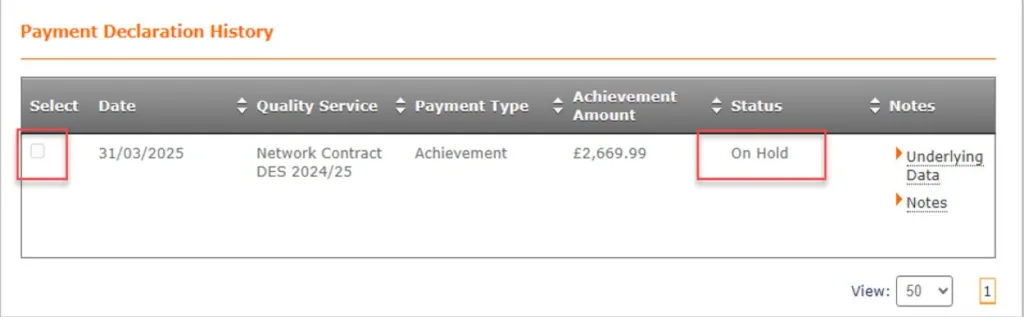
Payment Declaration On Hold – Payment Declaration History
If a practice has joined or left a PCN, the associated payment declaration will be placed ‘On Hold’ automatically by the system. Users can view the ‘On Hold’ status by navigating to the Achievement tab and selecting View Payment Declaration History on CQRS.
Payment declaration On Hold – Practice Joins a PCN
If a practice joins a PCN and an attempt is made to remove the hold on achievement, the following message will appear:

If the Commissioner determines that the achievement figures are accurate and do not require recalculation, the hold may be lifted. The declaration process can then proceed as usual.
Note: Data reaggregation runs daily overnight to ensure that achievement data cannot be declared based on incorrect values until all the data, including the new submitted values, have been reaggregated.
Payment declaration On Hold – Practice leaves a PCN
If a practice leaves a PCN and an attempt is made to remove the hold on achievement, the following message will appear prior to reaggregation:

Note: Data reaggregation runs daily overnight to ensure that achievement data cannot be declared based on incorrect values until all the data, including the new submitted values, have been reaggregated.
3. Payment Declaration Following Financial Approval
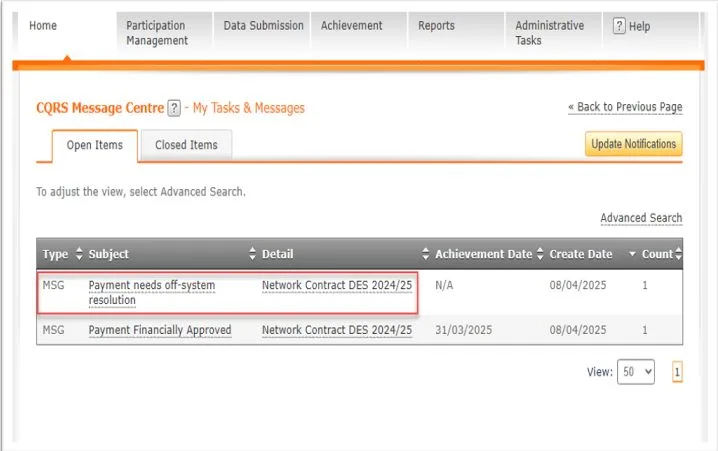
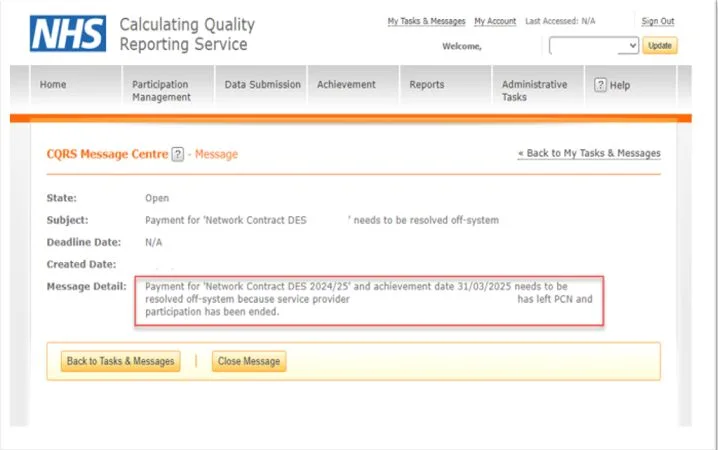
Off-System resolution required where Payment declaration has been financially approved and a Practice leaves or joins a PCN
If Payment declaration has been financially approved a Practice leaves and/or joins a PCN, the below messages are displayed on the CQRS message centre that the payment requires an off-system resolution.
Non-urgent advice: Need help?
If you need help with CQRS, you can log a call with the service desk. Please email: support@cqrs.co.uk or call 0330 124 4039.
How to Check a PCN’s Relationship in CQRS National
Background
This guide outlines the various steps in which different users can check their PCN relationship in CQRS National.
ICB Commissioner
Steps to run Network organisation relationship report:
- Go to Reports
- Go to Administrative sub tab
- Select Network organisation relationship
- Enter the start and end date
- Run report
The ICB will need to filter to the PCN to see all practices with a current relationship to that PCN. They can filter to a practice to see all their current and past relationships within the time period entered in the steps above.
GP User
Steps to run Network organisation relationship report:
- Go to Reports
- Go to Administrative sub tab
- Select Network organisation relationship
- Enter the start and end date
- Run report
The user will see all current practices within the PCN in the time period entered in the step above.
Using the CQRS dashboard:
- Go to Data submission tab
- Go to Network achievement sub tab
- Select the financial year
- Select the service
- Select the latest achievement date
PCN User
Steps to run Network organisation relationship report:
- Go to Reports
- Go to Administrative sub tab
- Select Network organisation relationship
- Enter the start and end date
- Run report
The user will see all current practices within the PCN in the time period entered in the step above.
Using the CQRS dashboard:
- Go to Data submission tab
- Go to Network achievement sub tab
- Select the financial year
- Select the service
- Select the latest achievement date
Non-urgent advice: Need help?
If you need help with CQRS, you can log a call with the service desk. Please email: support@cqrs.co.uk or call 0330 124 4039.
CQRS Local Administration and Account Management
Non-urgent advice: Need help?
If you need help with CQRS, you can log a call with the service desk. Please email: support@cqrs.co.uk or call 0330 124 4039.
CQRS Local Commissioning Administrator Account Management
If you haven’t already got a CQRS Local Commissioning Administrator account, please register. The CQRS Service Desk will then approve your account. Please regularly check your emails and click on the link within the email to complete the account registration.
Pending Actions – Managing Registrations
When a GP practice user registers for a CQRS Local account, their request will be within this section.
- Log into CQRS Local.
2. From your home page, click on the Pending Actions menu tile.
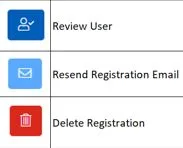
3. Click on the Review User button.

Note: You can sort each column by date or by approval etc by clicking on the header arrows.
4. To Approve this account, select the Approve option and then click the Confirm button. The user will then receive notification via email that their account has been approved. They should then click on the link to complete the registration set up. Once confirmed you will see them in the Users section.

Note: If you need to Reject the registration, you will need to give a reason and then click on the Confirm button. The user will then receive notification via email that their account has been rejected. Please note that you will need to reject any requests where a generic email address has been used and the name doesn’t identify an individual. Such examples are shown below.

Managing your System Users
You will also need to check any requests that are within the Users section. These are, for example, Practice Managers who have had an account previously approved and have requested access to an additional GP practice.
- From your home page, click on the Users menu tile.
2. Click on the Review button and follow the same steps as above.

Inviting New and Existing Users to New Roles
As an Administrator you have the ability to invite a user rather than them registering for an account.
- Click on the Invite button.
2. Enter the users email address and click on the blue arrow button.
3. Enter the first and last name of the new user and click on the Next button.
4. Select the organisation you want to invite the new user to and click Next.
5. Next is to select the role you wish for the user to be set up with and click Next.
6. An email invite will generate. Check that everything is correct and then click Send.
Revoking a User Account
Revoking an account is when you remove all access to an account associated to that organisation. The user will still be able to login using their credentials and will still be able to get to the My Profile page and then can request access to another organisation.
- From the CQRS Local homepage, click on the Users menu tile.
2. Find the user whose account you wish to disable and click on the View button.
3. Scroll down to the bottom of the screen and click on the red Revoke button.
4. Click the Confirm button.
Re-enabling a User Account
Re-enabling a CQRS Local account will give the user back their access.
- From the CQRS Local homepage, click on the Users menu tile.
2. Find the user whose account you wish to disable and click on the View button.
3. Scroll down to the bottom of the screen and click on the blue Enable Account button.
4. Click the Confirm button.
Disabling a User Account
Disabling an account – this is in effect an account deletion (their data is retained for audit reasons) so if they try to login into the application, they will be notified that their account has been disabled and therefore will be unable to access CQRS Local for all organisations they are registered at.
There are two ways in which this could be done. Firstly, the user themselves could disable their own account, if for example they no longer required access. Secondly, this can be done by the Administrator. The below instructions will be for the Administrator to disable the users account.
- From the CQRS Local homepage, click on the Users menu tile.
2. Find the user whose account you wish to disable and click on the View button.
3. Scroll down to the bottom of the screen and click on the Disable Account button.
4. Select a reason why you are disabling the account. There is an ‘Other’ option, which if selected will prompt you to enter some information. Please enter as much detail as possible up to a maximum of 250 characters.
5. Click the Confirm button.
What the Buttons Mean
Version 1.1, January 2024
Non-urgent advice: Need help?
If you need help with CQRS, you can log a call with the service desk. Please email: support@cqrs.co.uk or call 0330 124 4039.
CQRS Local Service Provider Claim Submission Multi Service
Multi-Service Claim Submissions mean that your Commissioner has requested that all service claims can be submitted as one claim rather than being submitted individually.
IMPORTANT – Under no circumstances should you attach or reference any kind of Patient Identifiable Data (PID) when submitting your claim. Your Commissioning Organisation will never request this kind of information.
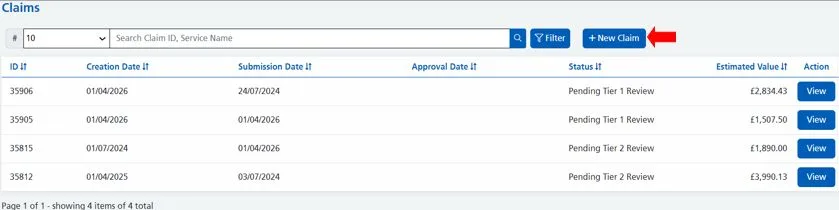
Please note that if you have not got a +New Claim button, it will mean one of three things:
- The claim window has not yet opened. For further information, please refer to the section titled Viewing your Claims Windows (Schedules).
2. You have submitted all your services claims and have no more claims to process.
3. You have missed your claims window. If this is the case, please contact your Primary Care Team.
- From your Claims page, click on the +New Claim button.
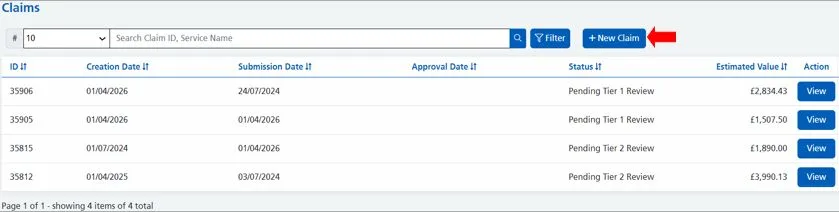
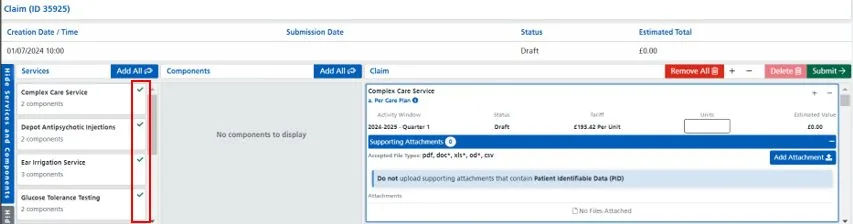
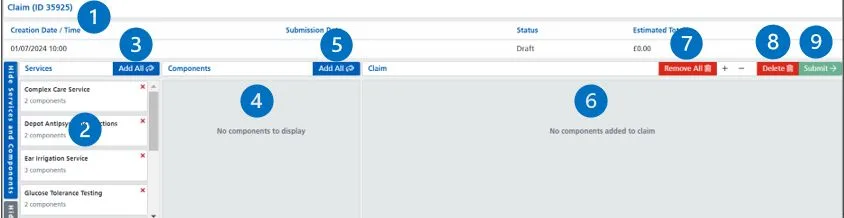
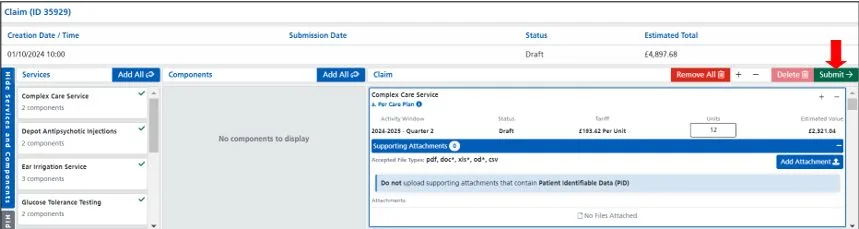
2. You will then be presented with your claims page. Each section will be explained below.
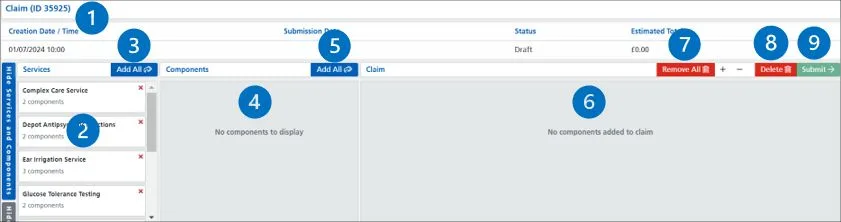
1 = Claim ID – this is automatically generated by the system once the +New Claim button has been clicked on.
2 = Services Pane – this lists the services that are currently available to claim. Each service shows the service name and how many components are part of that service.
3 = Add All button 1 – this will add all the services into the components pane.
4 = Components Pane – this section lists the components for the service(s) selected in the services section and lets you add the components to the claim.
5 = Add All button 2 – this will add all the services and their components into the components pane.
6 = Claim Pane – the claim section contains the components that have been added to the claim and is what will be submitted for approval. This section is where you complete the details of the claim such as unit values, add attachments, and if required, complete supplementary information.
7 = Remove All – this will remove all components from the claim.
8 = Delete – this will delete the claim as if it hadn’t been started in the first place.
9 = Submit – clicking this button will validate the claim and submit it for approval.
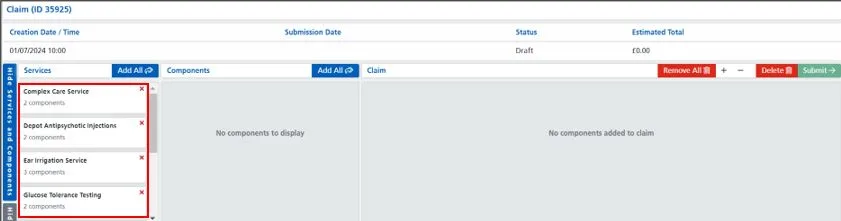
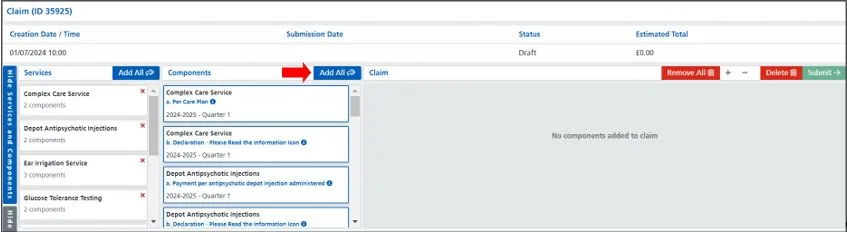
3. Your eligible services to claim for are listed under the Services pane. Use the grey bar to scroll further down the Services pane.

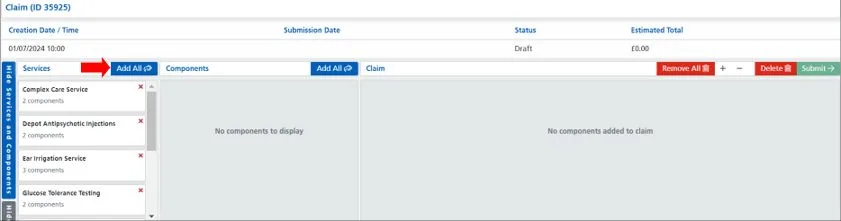
4. Click once on your first Add All button. This will add all services and all components into the Component pane.
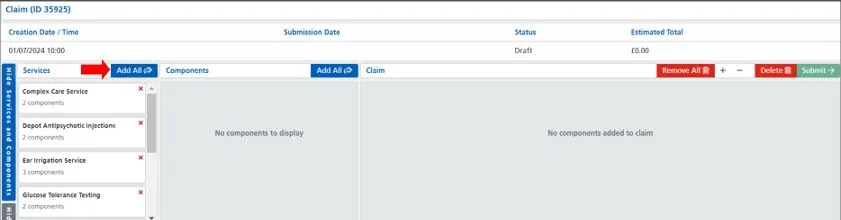
5. All associated services and components will then appear in the Components pane. Click on the second Add All button. Please note that if you see individual Add+ buttons within the component box – these are for organisations who do not have claims windows. If this is the case, click on the component you wish to include into the claim.
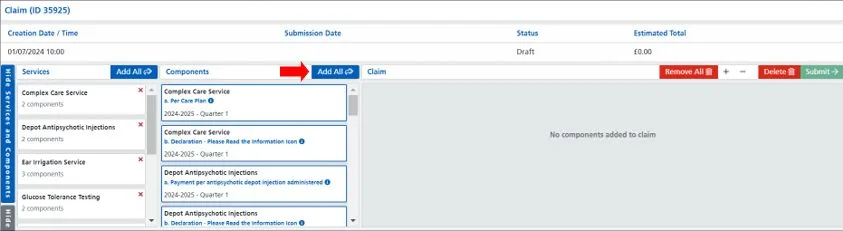
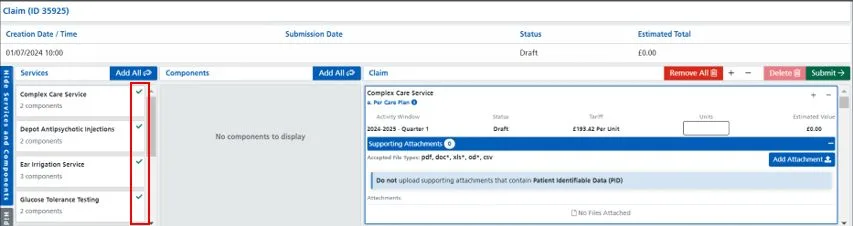
6. All associated services and components will then appear in the Components pane. A green tick will indicate that the service is currently being processed.
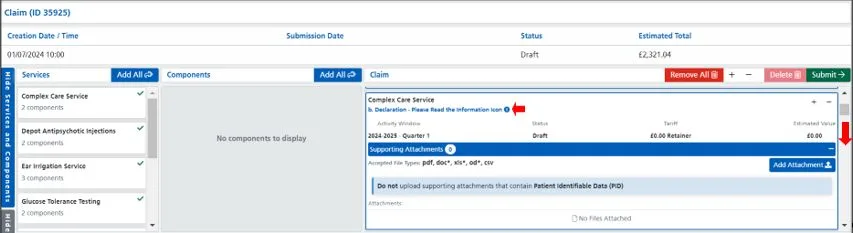
7. You can now proceed with completing the claims. In this example, for the Quarter 1 period, there was a total of 12 Complex Care Plans created – this equates to £2,321.04.
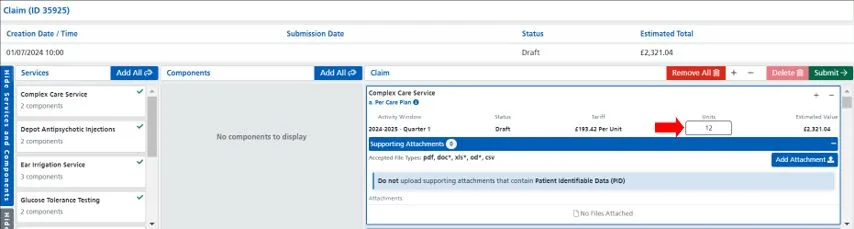
8. Next, is to scroll down to see the second of the two components. You can use the scroll bar to move further down the page. This component is a Retainer and doesn’t require the inputting of information – it is asking to read the information icon. Please make sure that you read this and understand it.

9. Keep scrolling down the list of service components entering in the required information.
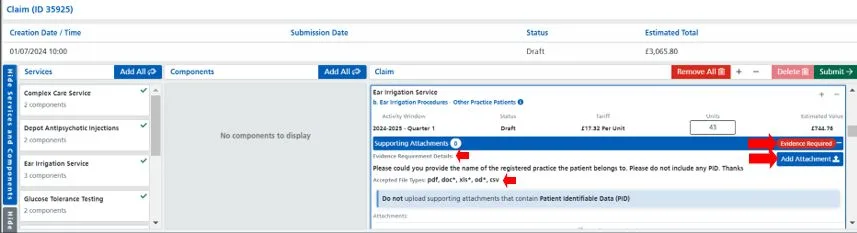
10. One of the components within the list is for the Ear Irrigation Service and requires the upload of a document. This is displayed with the following icon:
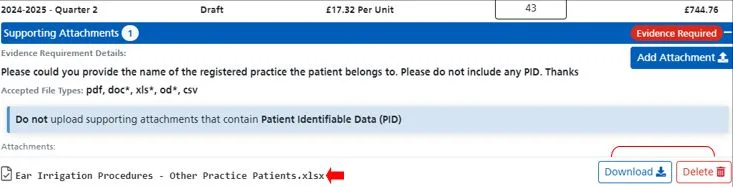
and is mandatory if you enter the number 1 or more into the Units box. If you haven’t achieved anything for any component which requires the upload of a document – enter a ‘0’ (zero) into the Units box – you will NOT be required to upload anything.
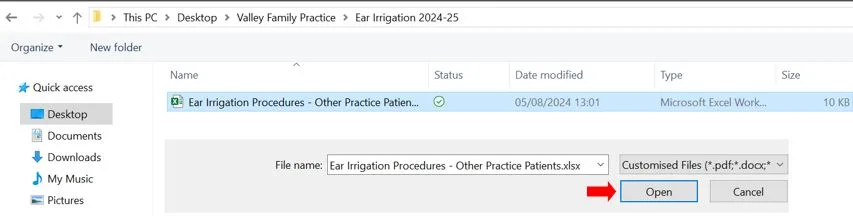
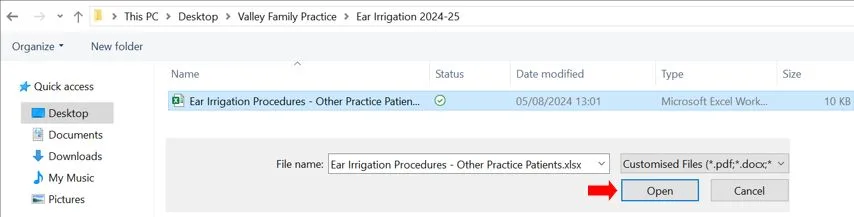
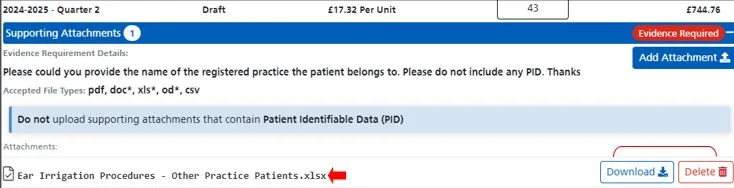
11. Under the Evidence Requirement Details, you will see what the requirements are. In this scenario there is a request to “Please could you provide the name of the registered practice the patient belongs to. Please do not include any PID. Thanks” It will also state which file types are accepted. Click on the Add Attachment button and navigate to the area on your computer where this document will be located.

12. Once you have located the file, highlight it once and click on the Open button.
13. We see that the file has been successfully uploaded into CQRS Local. On the right-hand side of the screen, there are two buttons; the Download button will allow you to download the file to ensure that it’s the correct file. The Delete button will remove the file from the system. If you do need to delete a file, use the Add Attachment button again to re-upload the correct file.
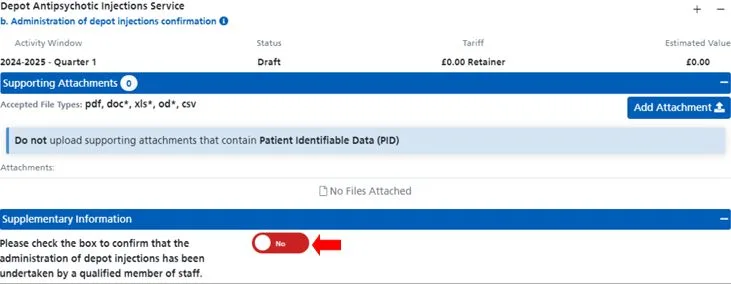
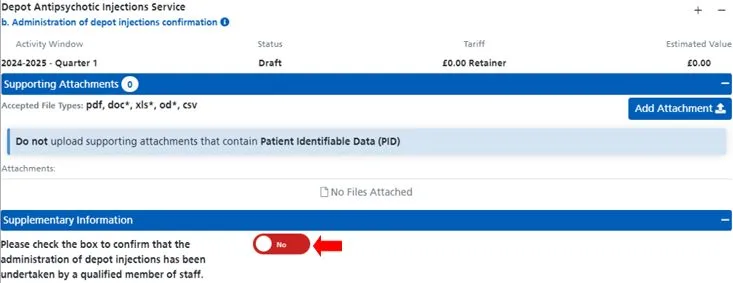
14. You may have a service which has Supplementary Information. Commissioners’ can attach questions to each component that need to be completed when creating a claim. This could be for example; to confirm Yes or No or it could be requesting the name of a clinician who undertook a certain procedure. The example below is for the Depot Antipsychotic Injections Service and requires confirmation that the administration of depot injections has been undertaken by a qualified member of staff. Once this information has been understood, switch the toggle button from No to Yes.
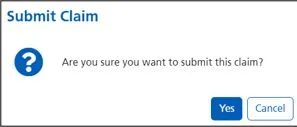
15. Continue moving down the page and enter all required information for each and every service components. Finally, when the claim is ready, check that all the information has been checked and then click on the green Submit button.

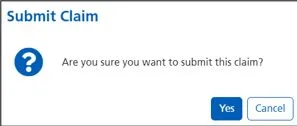
16. Confirm that you wish to submit the claim.
17. You will then be presented with a claims summary screen. This confirms the claim information that you have submitted.
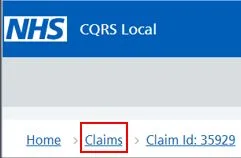
18. To return to your claims page, click on the Claims link in the upper left-hand side of your screen.
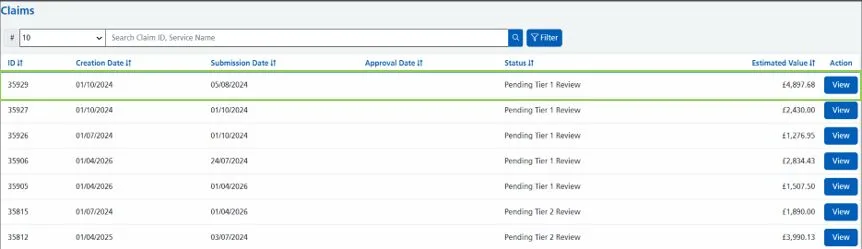
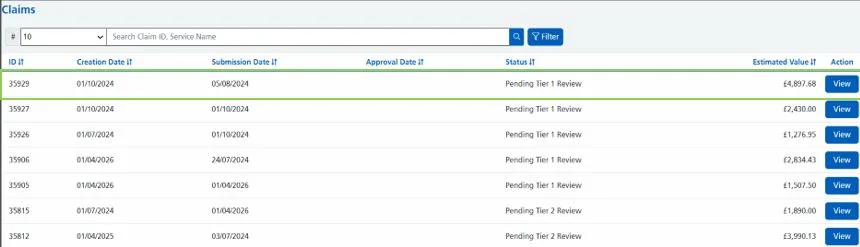
Please note: if you have attached any documentation, you will temporarily see a status of Pending System Review. This means that it the documents are going through an anti-malware check to make sure the file(s) are free from malicious software. After approximately 60 seconds, the status will change to Pending Tier 1 Review.
19. The claim has now been submitted and the system has generated a Claim ID. The ID is 35929.
Non-urgent advice: Need help?
If you need help with CQRS, you can log a call with the service desk. Please email: support@cqrs.co.uk or call 0330 124 4039.
CQRS Local Service Provider Claim Submission Single Service
Single-Service Claim Submissions mean that your Commissioner has requested that all service claims can be submitted as one claim rather than being submitted individually.
IMPORTANT – Under no circumstances should you attach or reference any kind of Patient Identifiable Data (PID) when submitting your claim. Your Commissioning Organisation will never request this kind of information.
Please note that if you have not got a +New Claim button, it will mean one of three things:
- The claim window has not yet opened. For further information, please refer to the section titled Viewing your Claims Windows (Schedules).
- You have submitted all your services claims and have no more claims to process.
- You have missed your claims window. If this is the case, please contact your Primary Care Team.
- From your Claims page, click on the +New Claim button.
2. You will then be presented with your claims page. Each section will be explained below.
1 = Claim ID – this is automatically generated by the system once the +New Claim button has been clicked on.
2 = Services Pane – this lists the services that are currently available to claim. Each service shows the service name and how many components are part of that service.
3 = Add All button 1 – this will add all the services into the components pane.
4 = Components Pane – this section lists the components for the service(s) selected in the services section and lets you add the components to the claim.
5 = Add All button 2 – this will add all the services and their components into the components pane.
6 = Claim Pane – the claim section contains the components that have been added to the claim and is what will be submitted for approval. This section is where you complete the details of the claim such as unit values, add attachments, and if required, complete supplementary information.
7 = Remove All – this will remove all components from the claim.
8 = Delete – this will delete the claim as if it hadn’t been started in the first place.
9 = Submit – clicking this button will validate the claim and submit it for approval.
3. Your eligible services to claim for are listed under the Services pane. Use the grey bar to scroll further down the Services pane.
4 Click once on your first Add All button. This will add all services and all components into the Component pane.
5. All associated services and components will then appear in the Components pane. Click on the second Add All button. Please note that if you see individual Add+ buttons within the component box – these are for organisations who do not have claims windows. If this is the case, click on the component you wish to include into the claim.
6. All associated services and components will then appear in the Components pane. A green tick will indicate that the service is currently being processed.
7. You can now proceed with completing the claims. In this example, for the Quarter 1 period, there was a total of 12 Complex Care Plans created – this equates to £2,321.04.

8. Next, is to scroll down to see the second of the two components. You can use the scroll bar to move further down the page. This component is a Retainer and doesn’t require the inputting of information – it is asking to read the information icon. Please make sure that you read this and understand it.
9. Keep scrolling down the list of service components entering in the required information.
10. One of the components within the list is for the Ear Irrigation Service and requires the upload of a document. This is displayed with the following icon:
and is mandatory if you enter the number 1 or more into the Units box. If you haven’t achieved anything for any component which requires the upload of a document – enter a ‘0’ (zero) into the Units box – you will NOT be required to upload anything.
11. Under the Evidence Requirement Details, you will see what the requirements are. In this scenario there is a request to “Please could you provide the name of the registered practice the patient belongs to. Please do not include any PID. Thanks” It will also state which file types are accepted. Click on the Add Attachment button and navigate to the area on your computer where this document will be located.
12. Once you have located the file, highlight it once and click on the Open button.
13. We see that the file has been successfully uploaded into CQRS Local. On the right-hand side of the screen, there are two buttons; the Download button will allow you to download the file to ensure that it’s the correct file. The Delete button will remove the file from the system. If you do need to delete a file, use the Add Attachment button again to re-upload the correct file.
14. You may have a service which has Supplementary Information. Commissioners’ can attach questions to each component that need to be completed when creating a claim. This could be for example; to confirm Yes or No or it could be requesting the name of a clinician who undertook a certain procedure. The example below is for the Depot Antipsychotic Injections Service and requires confirmation that the administration of depot injections has been undertaken by a qualified member of staff. Once this information has been understood, switch the toggle button from No to Yes.
15. Continue moving down the page and enter all required information for each and every service components. Finally, when the claim is ready, check that all the information has been checked and then click on the green Submit button.
16. Confirm that you wish to submit the claim.
17. You will then be presented with a claims summary screen. This confirms the claim information that you have submitted.
18. To return to your claims page, click on the Claims link in the upper left-hand side of your screen.
Please note: if you have attached any documentation, you will temporarily see a status of Pending System Review. This means that it the documents are going through an anti-malware check to make sure the file(s) are free from malicious software. After approximately 60 seconds, the status will change to Pending Tier 1 Review.
19. The claim has now been submitted and the system has generated a Claim ID. The ID is 35929.
Non-urgent advice: Need help?
If you need help with CQRS, you can log a call with the service desk. Please email: support@cqrs.co.uk or call 0330 124 4039.
CQRS Local User Guide for Commissioners
Non-urgent advice: Need help?
If you need help with CQRS, you can log a call with the service desk. Please email: support@cqrs.co.uk or call 0330 124 4039.
CQRS Local User Guide for Service Providers
Non-urgent advice: Need help?
If you need help with CQRS, you can log a call with the service desk. Please email: support@cqrs.co.uk or call 0330 124 4039.