User Type: Commissioners
GP Reimbursement Scheme – Commissioner User Guide
Offer Services Contracts – Service Provider Signup Process
This is a new feature allowing the commissioner to create a contract for a service and have the service offered to all their providers. Each of the providers can then respond to the offer by accepting or declining the service.
These instructions will start from the contract creation part.
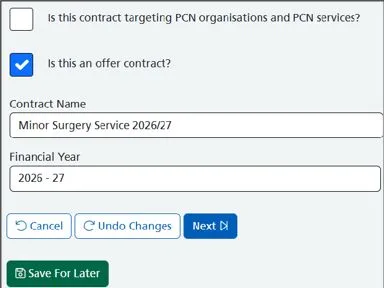
Contract Creation
- Click on the New Contract button.
- Place a tick in the Is this an offer contract?
- Enter the service name into the Contract Name.
- Click Next.
5. Click Next again, or click on the Services tab.
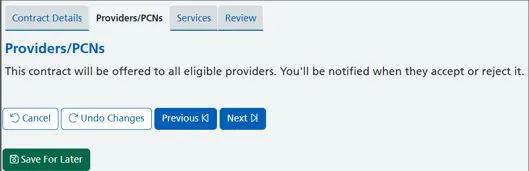
6. Locate your service from the service list and select all components (if applicable).
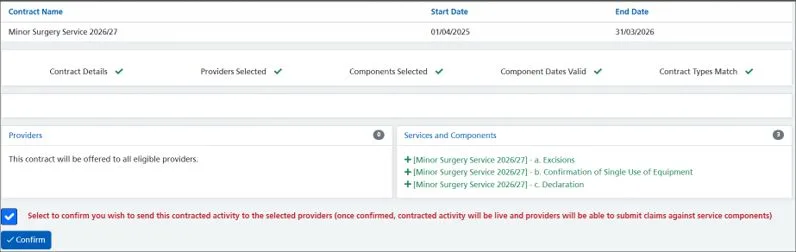
7. Click Next or click on the Review button.
8. Finally, place a tick to confirm and click on the Confirm button.
The providers will now be in receipt of this service offer.
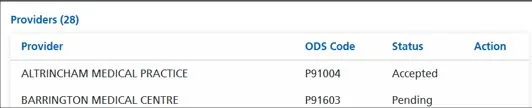
You will then see a list of all your providers with a Pending status.

Provider can Accept/Decline.
GP Practices can follow the instructions from this point.
- From your home page, click on the Services menu tile.
2. Click on the View button.
The contract status is: Pending.

3. Click on the Accept service offer button. If, as a practice, you won’t be participating in this service or feel that you may have been offered it by mistake, click on the Reject button.
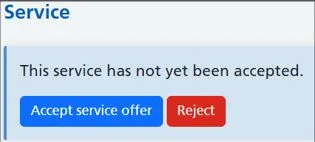
The contract status is: Active.
Provider’s response shown to commissioner:
Within your contracts page, you will see the total number of providers who have accepted the service – the number will be displayed underneath the Providers column.
- Click on the View button

Here we can see that one provider has accepted and the other is in pending.
If the provider rejects by mistake, they can request the commissioner to reissue the offer.
- From your Services page, click on the View button underneath Action.

Click on the Request this service from the commissioner button.

Commissioner re-issues the service.
At this point, the Commissioner will need to reissue the service.
- Click on the Reissue button.
The provider should then accept the service, and the status will change to Accepted.

Version 1.0 April 2026
What happens if a change is made after an Achievement has been Declared in the Network Contract DES Service?
Purpose of this guide
This guide walks through functionality in CQRS for the Network Contract DES (NCD) service that ensures that any declarations reflect the most up-to-date achievement figures, even if changes occur after an initial declaration request. These updates ensure accuracy and clarity when:
- A practice joins or leaves a PCN (Primary Care Network)
- Data is amended at indicator level
Topics Covered
- Updated Achievement After Re-calculation
What users will see when achievement values need to be recalculated
2. Practice Joins or Leaves a PCN After Calculation
What users will see when a practice has joined or left a PCN after the calculation has been run.
3. Payment Declaration Following Financial Approval
What users will see once payment declarations have been financially approved.
1. Updated Achievement After Re-calculation
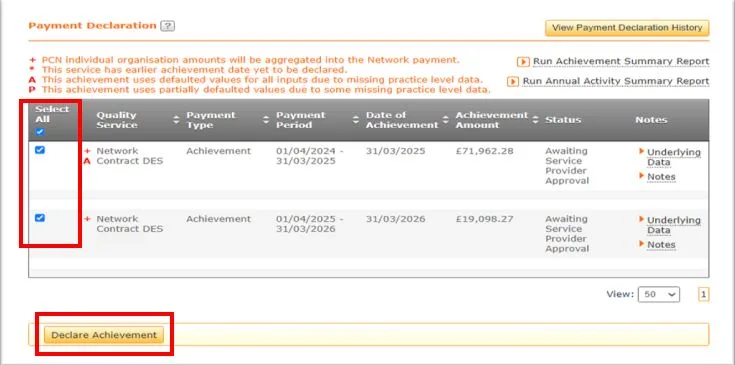
Payment declaration requested – Achievement data awaiting reaggregation
If the Service Provider user clicks the Declare Achievement button but there is achievement waiting to be aggregated the below message is returned.
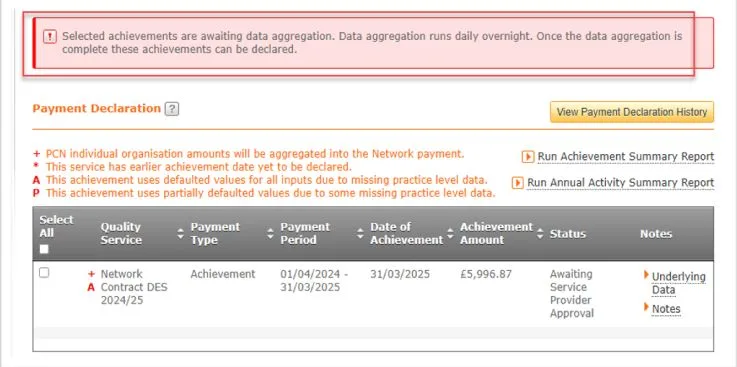

Note: Data reaggregation runs daily overnight to ensure that achievement data cannot be declared based on incorrect values until all the data, including the new submitted values, have been reaggregated.
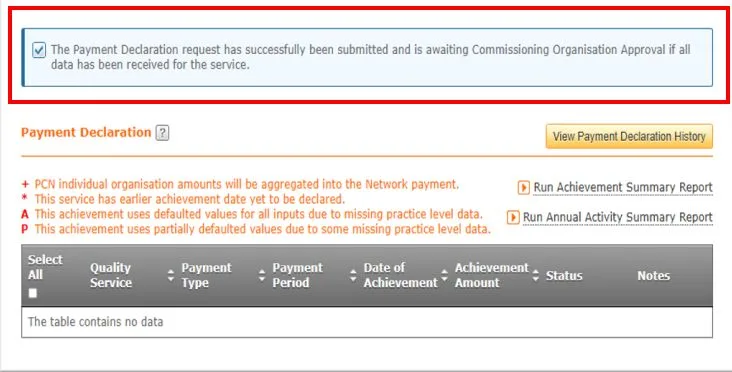
Payment declaration requested – Awaiting Commissioning Organisation Approval
If achievement was recalculated overnight due to changes, the achievement will revert back to Awaiting Service Provider Approval and can then be re-declared by the PCN and the status will then move to Awaiting Commissioning Organisation Approval.
Note: Data reaggregation runs daily overnight to ensure that achievement data cannot be declared based on incorrect values until all the data, including the new submitted values, have been reaggregated.
Payment declaration requested- For multiple achievements, though one or more are still pending data aggregation
If declaration is attempted for multiple achievements but one or more of those achievements are awaiting aggregation the below message will be displayed.
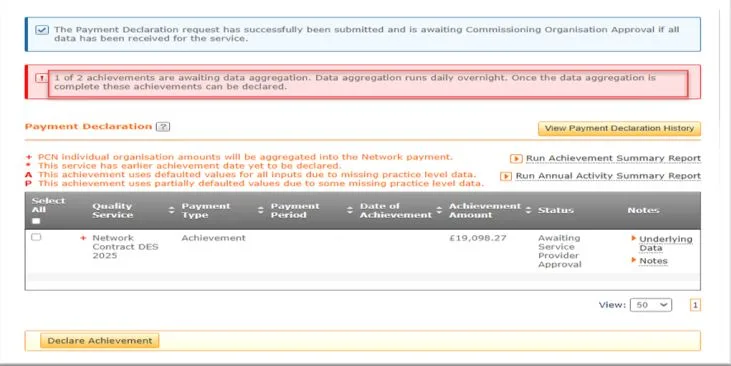
Note: Data reaggregation runs daily overnight to ensure that achievement data cannot be declared based on incorrect values until all the data, including the new submitted values, have been reaggregated.
2. Practice Joins or Leaves a PCN After Calculation
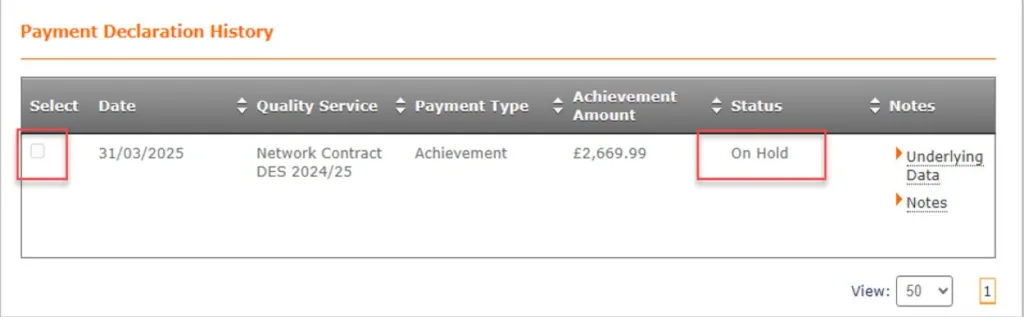
Payment Declaration On Hold – Payment Declaration History
If a practice has joined or left a PCN, the associated payment declaration will be placed ‘On Hold’ automatically by the system. Users can view the ‘On Hold’ status by navigating to the Achievement tab and selecting View Payment Declaration History on CQRS.
Payment declaration On Hold – Practice Joins a PCN
If a practice joins a PCN and an attempt is made to remove the hold on achievement, the following message will appear:

If the Commissioner determines that the achievement figures are accurate and do not require recalculation, the hold may be lifted. The declaration process can then proceed as usual.
Note: Data reaggregation runs daily overnight to ensure that achievement data cannot be declared based on incorrect values until all the data, including the new submitted values, have been reaggregated.
Payment declaration On Hold – Practice leaves a PCN
If a practice leaves a PCN and an attempt is made to remove the hold on achievement, the following message will appear prior to reaggregation:

Note: Data reaggregation runs daily overnight to ensure that achievement data cannot be declared based on incorrect values until all the data, including the new submitted values, have been reaggregated.
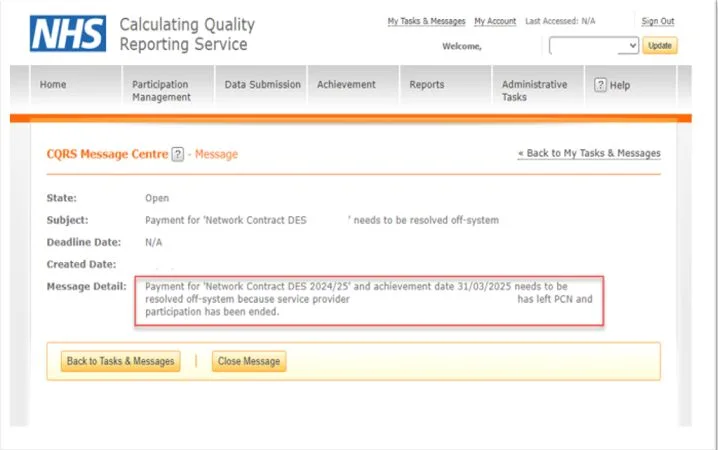
3. Payment Declaration Following Financial Approval
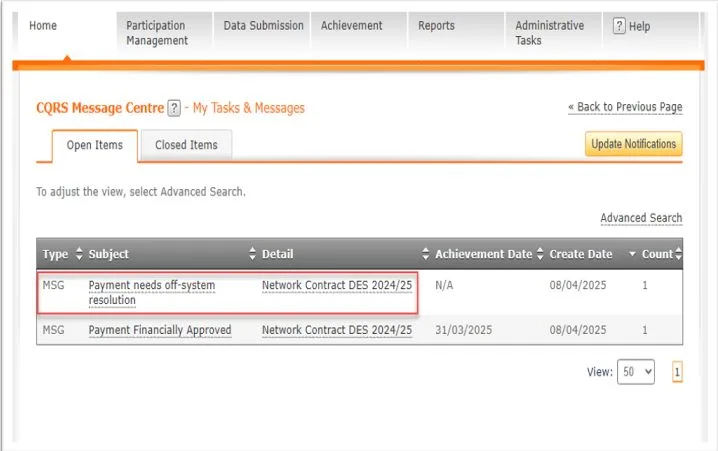
Off-System resolution required where Payment declaration has been financially approved and a Practice leaves or joins a PCN
If Payment declaration has been financially approved a Practice leaves and/or joins a PCN, the below messages are displayed on the CQRS message centre that the payment requires an off-system resolution.
Non-urgent advice: Need help?
If you need help with CQRS, you can log a call with the service desk. Please email: support@cqrs.co.uk or call 0330 124 4039.
How to Check a PCN’s Relationship in CQRS National
Background
This guide outlines the various steps in which different users can check their PCN relationship in CQRS National.
ICB Commissioner
Steps to run Network organisation relationship report:
- Go to Reports
- Go to Administrative sub tab
- Select Network organisation relationship
- Enter the start and end date
- Run report
The ICB will need to filter to the PCN to see all practices with a current relationship to that PCN. They can filter to a practice to see all their current and past relationships within the time period entered in the steps above.
GP User
Steps to run Network organisation relationship report:
- Go to Reports
- Go to Administrative sub tab
- Select Network organisation relationship
- Enter the start and end date
- Run report
The user will see all current practices within the PCN in the time period entered in the step above.
Using the CQRS dashboard:
- Go to Data submission tab
- Go to Network achievement sub tab
- Select the financial year
- Select the service
- Select the latest achievement date
PCN User
Steps to run Network organisation relationship report:
- Go to Reports
- Go to Administrative sub tab
- Select Network organisation relationship
- Enter the start and end date
- Run report
The user will see all current practices within the PCN in the time period entered in the step above.
Using the CQRS dashboard:
- Go to Data submission tab
- Go to Network achievement sub tab
- Select the financial year
- Select the service
- Select the latest achievement date
Non-urgent advice: Need help?
If you need help with CQRS, you can log a call with the service desk. Please email: support@cqrs.co.uk or call 0330 124 4039.
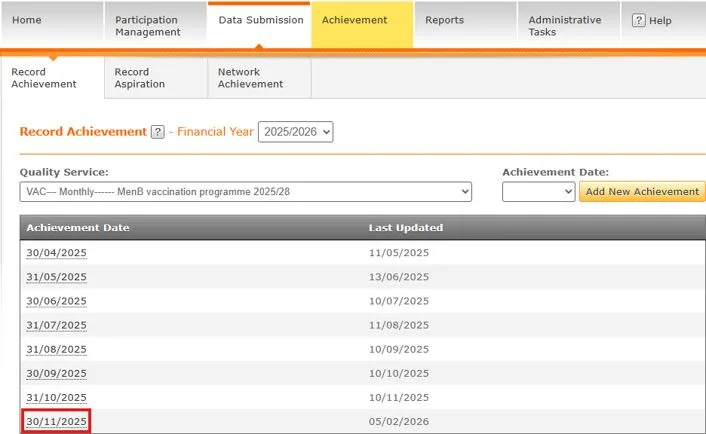
Identifying Missing Data Network Contract DES 23/24 in CQRS National
This guide describes how to check what data is missing from your Network Contract DES (NCD) 2023-24 achievement.
Step-by-step guide
Once logged into CQRS, click on the ‘Data Submission’ tab
- Choose the relevant financial year – 23/24
- Select the quality service from the drop down box – DES— Annual—Network Contract DES 2023/24

- From the list of achievement dates select 31/03/2024
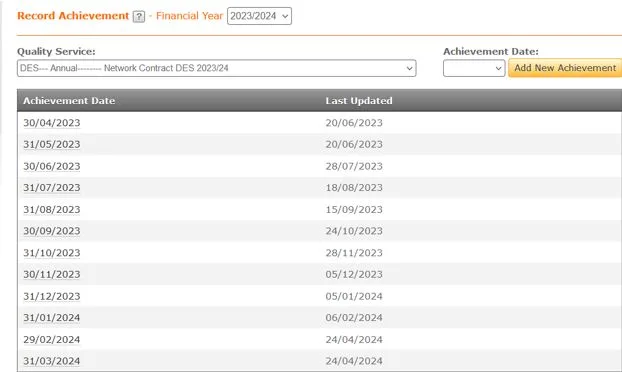
- If 31/03/24 does not appear in the achievement date list ensure you have the correct service selected. If you have moved PCNs throughout the year and have two different service offers you may have two different quality services available so ensure the correct one is selected.
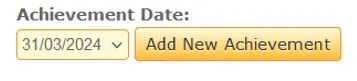
- If it still does not appear select it from the “Achievement Date” drop down and click “Add New Achievement”.
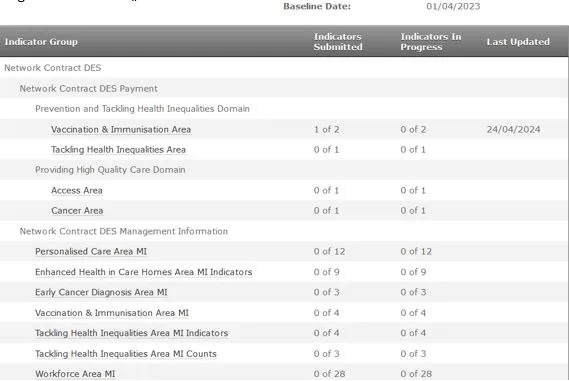
Once selected you will need to make sure all indicators submitted are the total possible value you can submit e.g. 2 of 2. If they are not equal, you will need to click into the group and enter the missing indicator data.
Non-urgent advice: Need help?
If you need help with CQRS, you can log a call with the service desk. Please email: support@cqrs.co.uk or call 0330 124 4039.
CQRS Local Commissioning Administrator Account Management
If you haven’t already got a CQRS Local Commissioning Administrator account, please register. The CQRS Service Desk will then approve your account. Please regularly check your emails and click on the link within the email to complete the account registration.
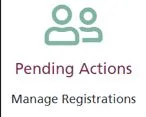
Pending Actions – Managing Registrations
When a GP practice user registers for a CQRS Local account, their request will be within this section.
- Log into CQRS Local.
2. From your home page, click on the Pending Actions menu tile.
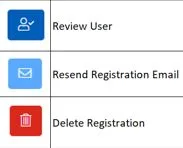
3. Click on the Review User button.

Note: You can sort each column by date or by approval etc by clicking on the header arrows.
4. To Approve this account, select the Approve option and then click the Confirm button. The user will then receive notification via email that their account has been approved. They should then click on the link to complete the registration set up. Once confirmed you will see them in the Users section.

Note: If you need to Reject the registration, you will need to give a reason and then click on the Confirm button. The user will then receive notification via email that their account has been rejected. Please note that you will need to reject any requests where a generic email address has been used and the name doesn’t identify an individual. Such examples are shown below.

Managing your System Users
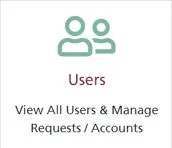
You will also need to check any requests that are within the Users section. These are, for example, Practice Managers who have had an account previously approved and have requested access to an additional GP practice.
- From your home page, click on the Users menu tile.
2. Click on the Review button and follow the same steps as above.

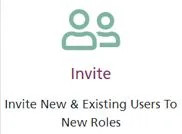
Inviting New and Existing Users to New Roles
As an Administrator you have the ability to invite a user rather than them registering for an account.
- Click on the Invite button.
2. Enter the users email address and click on the blue arrow button.
3. Enter the first and last name of the new user and click on the Next button.
4. Select the organisation you want to invite the new user to and click Next.
5. Next is to select the role you wish for the user to be set up with and click Next.
6. An email invite will generate. Check that everything is correct and then click Send.
Revoking a User Account
Revoking an account is when you remove all access to an account associated to that organisation. The user will still be able to login using their credentials and will still be able to get to the My Profile page and then can request access to another organisation.
- From the CQRS Local homepage, click on the Users menu tile.
2. Find the user whose account you wish to disable and click on the View button.
3. Scroll down to the bottom of the screen and click on the red Revoke button.
4. Click the Confirm button.
Re-enabling a User Account
Re-enabling a CQRS Local account will give the user back their access.
- From the CQRS Local homepage, click on the Users menu tile.
2. Find the user whose account you wish to disable and click on the View button.
3. Scroll down to the bottom of the screen and click on the blue Enable Account button.
4. Click the Confirm button.
Disabling a User Account
Disabling an account – this is in effect an account deletion (their data is retained for audit reasons) so if they try to login into the application, they will be notified that their account has been disabled and therefore will be unable to access CQRS Local for all organisations they are registered at.
There are two ways in which this could be done. Firstly, the user themselves could disable their own account, if for example they no longer required access. Secondly, this can be done by the Administrator. The below instructions will be for the Administrator to disable the users account.
- From the CQRS Local homepage, click on the Users menu tile.
2. Find the user whose account you wish to disable and click on the View button.
3. Scroll down to the bottom of the screen and click on the Disable Account button.
4. Select a reason why you are disabling the account. There is an ‘Other’ option, which if selected will prompt you to enter some information. Please enter as much detail as possible up to a maximum of 250 characters.
5. Click the Confirm button.
What the Buttons Mean
Version 1.1, January 2024
Non-urgent advice: Need help?
If you need help with CQRS, you can log a call with the service desk. Please email: support@cqrs.co.uk or call 0330 124 4039.
CQRS Local User Guide for Commissioners
Non-urgent advice: Need help?
If you need help with CQRS, you can log a call with the service desk. Please email: support@cqrs.co.uk or call 0330 124 4039.
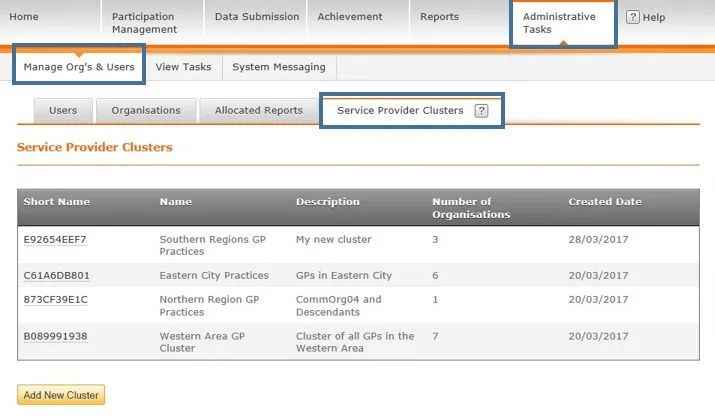
Removing an Organisation from a Service Provider Cluster in CQRS National
Once a Service Provider Cluster is created, you may remove organisations from the cluster. This job aid will review the steps for that task.
This job aid is aimed at users within a Commissioning Organisation with the role of Organisation Administrator.
Note: The data that appears in this job aid is for training purposes only and does not represent actual data.
- From the CQRS Home screen, select the Administrative Tasks tab, then select the Manage Org’s & Users sub-tab, and then select the Service Provider Clusters sub-tab
2. Click the Short Name of the Service Provider Cluster to update.
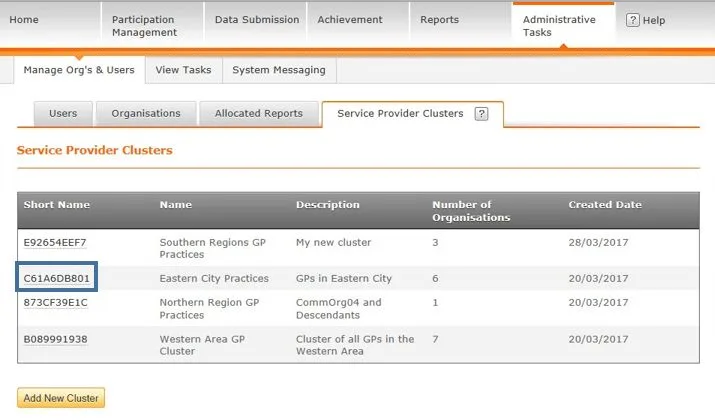
The Service Provider Cluster screen displays. Scroll down to view the Service Providers section.
3. Click the Remove Organisation link for the organisation you want to remove.
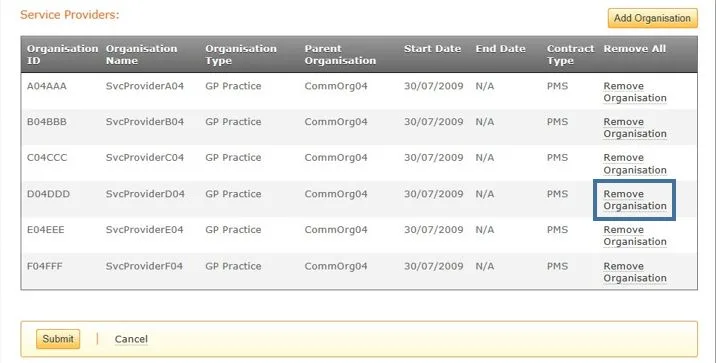
The Service Providers list updates to show the selected service provider will no longer be included in this cluster.
4. Once all updates have been made, you must click the Submit button at the bottom of the page to commit your changes.
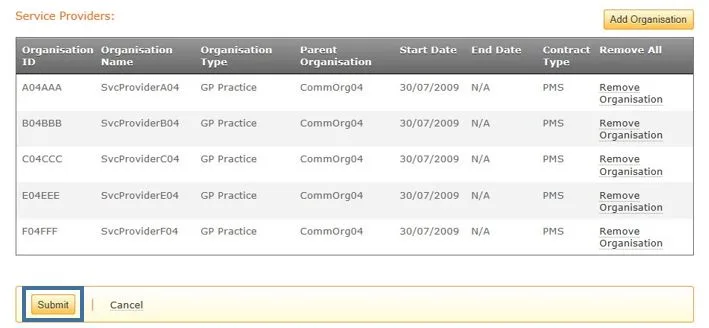
A confirmation message indicates the cluster was updated successfully.

Non-urgent advice: Need help?
If you need help with CQRS, you can log a call with the service desk. Please email: support@cqrs.co.uk or call 0330 124 4039.
Removing an Organisation from a Service Provider Cluster in CQRS National – video
Non-urgent advice: Need help?
If you need help with CQRS, you can log a call with the service desk. Please email: support@cqrs.co.uk or call 0330 124 4039.
Add or remove a CQRS user and assign a role in CQRS National
CQRS users are created or removed from the system by a CQRS User Administrator or an Advanced User Administrator.
Creating a new user is a two-stage process and requires you to 1) create the user account and 2) specify an associated organisation(s) and role(s) within the organisation(s).
A CQRS user cannot be deleted from the system. Removal involves revoking links to one or more organisations with which the user is associated. This is useful when a user is transferring between or leaving an organisation. If the user will no longer need to use CQRS, you can disable their CQRS user access.
This job aid describes the steps required to add or remove CQRS users. It also describes linking or unlinking organisations and disabling a user account.
Note: The data that appears in this job aid is for training purposes only and does not represent actual data.
Adding a New User
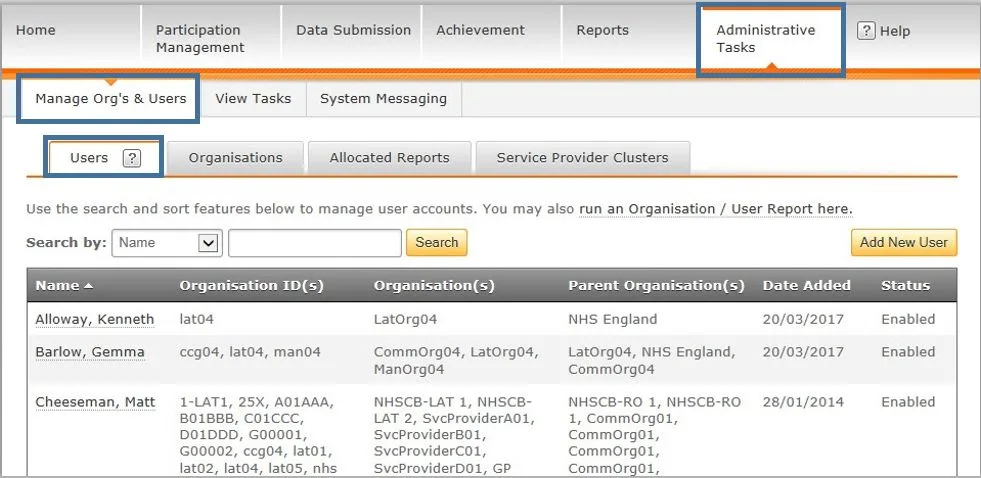
- From the CQRS Home screen, select the Administrative Tasks tab.
NOTE: CQRS displays current users, their organisation and the date they were added.
2. Select the Add New User button.
3. Select the Email Address field. Enter the email address associated with the new user.

4. Select or tab to the Confirm Email Address field and re-enter the email address associated with the new user.
5. Select the Continue button.
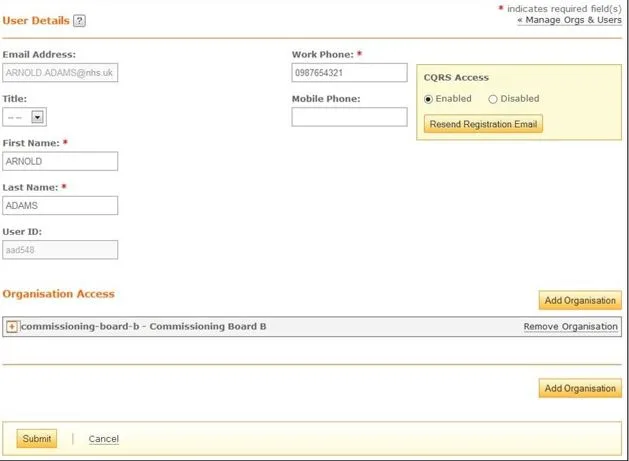
The Add New User–User Information screen displays. Note that the user email address information entered in the previous screen automatically appears. All fields, with the exception of Mobile Phone, are mandatory.
6. Complete all required fields.
Adding Organisation and Role
Next, you must link the new user with one or more organisations and specify their role permissions within those organisations.
7. Select the Add Organisation button.
8. If it is not visible, you can use the Search By filter to quickly find the organisation that is to be associated with the new user.
9. Select the checkbox next to the organisations that you wish to link to the new user.
10. Select the Submit button. An expanded view of the chosen organisation is displayed. Available CQRS roles can be viewed on this screen.
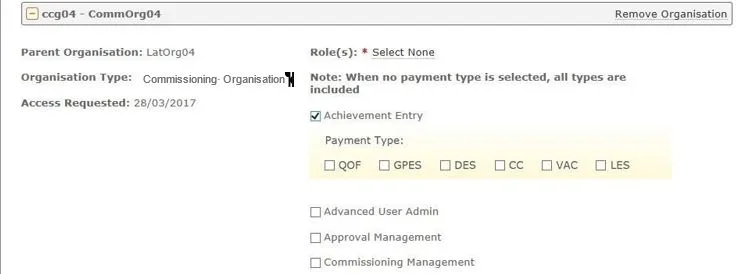
11. Select the relevant checkboxes next to the roles to be allocated to the new user.
NOTE: Each role expands to reveal payment-type capabilities. When you leave all Payment Type boxes unchecked, the user has access to all Payment Types for that particular role.
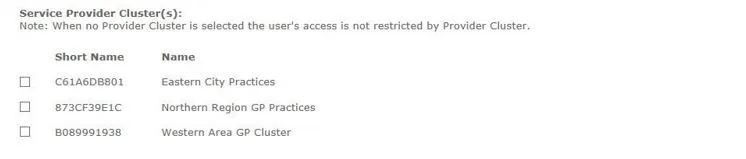
12. If relevant, select the checkbox next to the organisation’s Service Provider Cluster(s) to limit the user’s access within that organisation.
Reference Job Aid “Restricting User Access Using a Service Provider Cluster” for additional information on assigning a user to a Service Provider Cluster.
13. Select the Submit button. CQRS displays a message confirming that you have successfully added the new user.
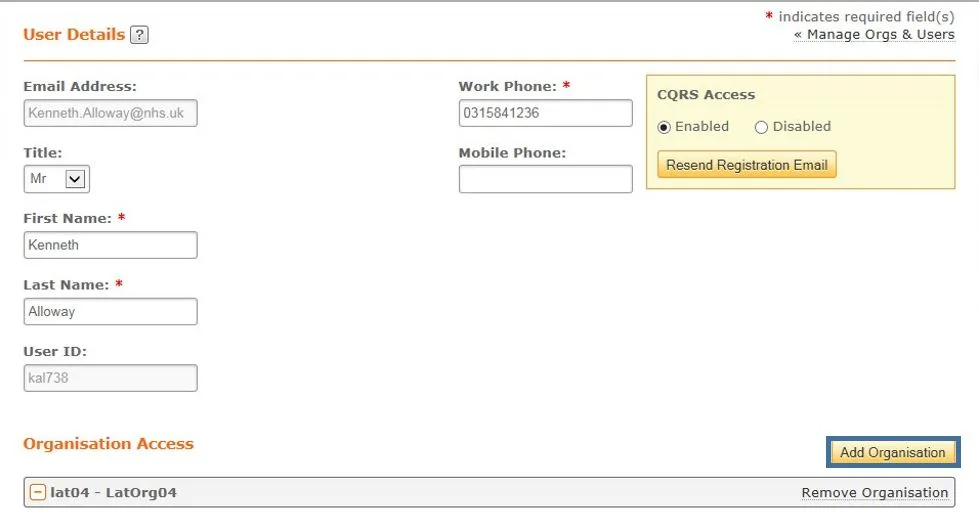
Removing Organisation Access for a User
Remember, you cannot delete a CQRS user. Removal simply means that you revoke any or all links to organisations. If the user no longer has responsibilities within CQRS, you can disable their access to the system.
- From the CQRS Home screen, select the Administrative Tasks tab.
NOTE: CQRS displays current users, their organisation and the date they were added. If the user name is not displayed, use the Search By filter to locate them.
2. Select the user name from the display list.
3. To remove access to an organisation, select the Remove Organisation link.
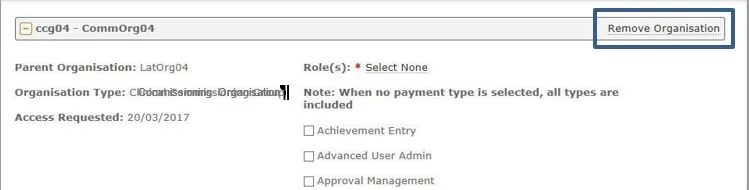
4. Select the Submit button.
CQRS displays a message confirming that you have successfully removed user access to the chosen organisation.
If the user no longer has any CQRS responsibilities, you will also need to disable their access to the system. If this is the case, continue with the steps described below.
Disabling a User Account
- In the upper right corner of the User Details screen, select the Disabled radio button.
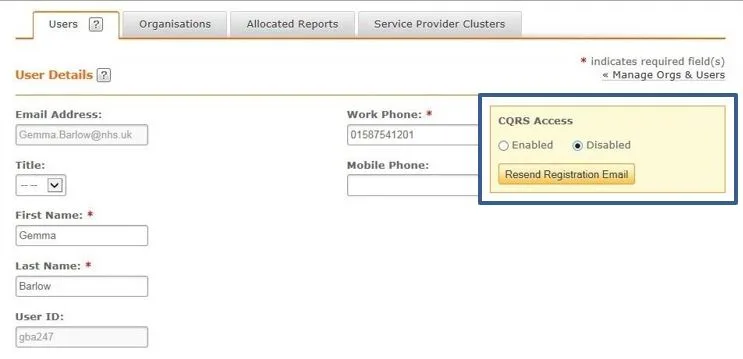
2. Select the Submit button.
CQRS displays a message confirming that you have successfully disabled the user’s CQRS access.
Non-urgent advice: Need help?
If you need help with CQRS, you can log a call with the service desk. Please email: support@cqrs.co.uk or call 0330 124 4039.
Adding or removing a CQRS user and assigning a role in CQRS National – video
Non-urgent advice: Need help?
If you need help with CQRS, you can log a call with the service desk. Please email: support@cqrs.co.uk or call 0330 124 4039.
Restricting user access using a Service Provider Cluster in CQRS National
A user may be restricted to specific organisations under a parent organisation through Service Provider Clusters. When a user is assigned to cluster, they may only access organisations listed in the cluster(s) along with the organisations descendants, even though they are not specifically listed in the cluster.
This job aid will demonstrate the steps for restricting user access with Service Provider Clusters.
This job aid is aimed at CQRS User Administrator and Advanced User Administrator who are responsible for overseeing and modifying user’s access to the CQRS system.
Note: The data that appears in this job aid is for training purposes only and does not represent actual data.
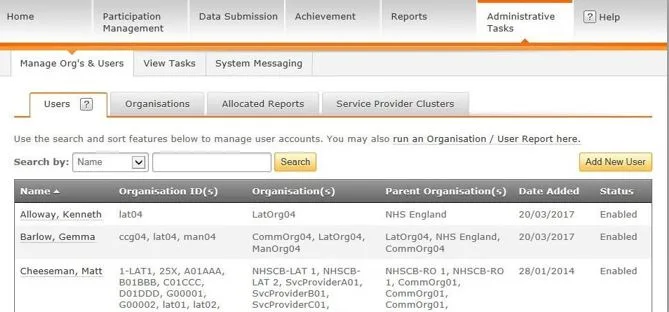
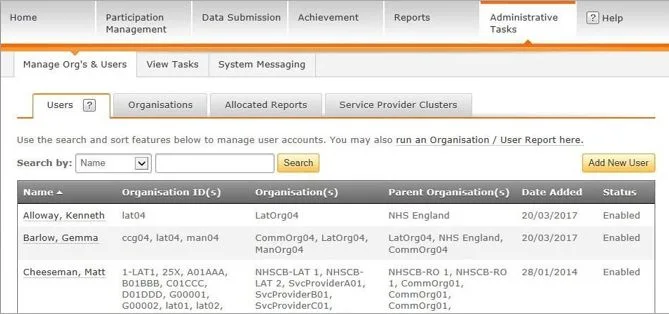
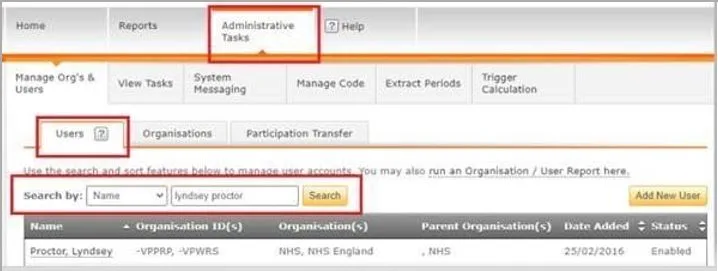
- From the CQRS Home screen, select the Administrative Tasks tab, then select the Manage Org’s & Users sub-tab, and then select the Users sub-tab.
2. Click the Name link of the user to update.

3. If the organisation is not already listed for the user, select the Add Organisation button on the User Details screen.
Once the organisation is added, available clusters will display under the organisations information along with the roles and payment types. If clusters have not been created for the organisation, a default message of “There are no Provider Clusters defined for this organisation” will display.
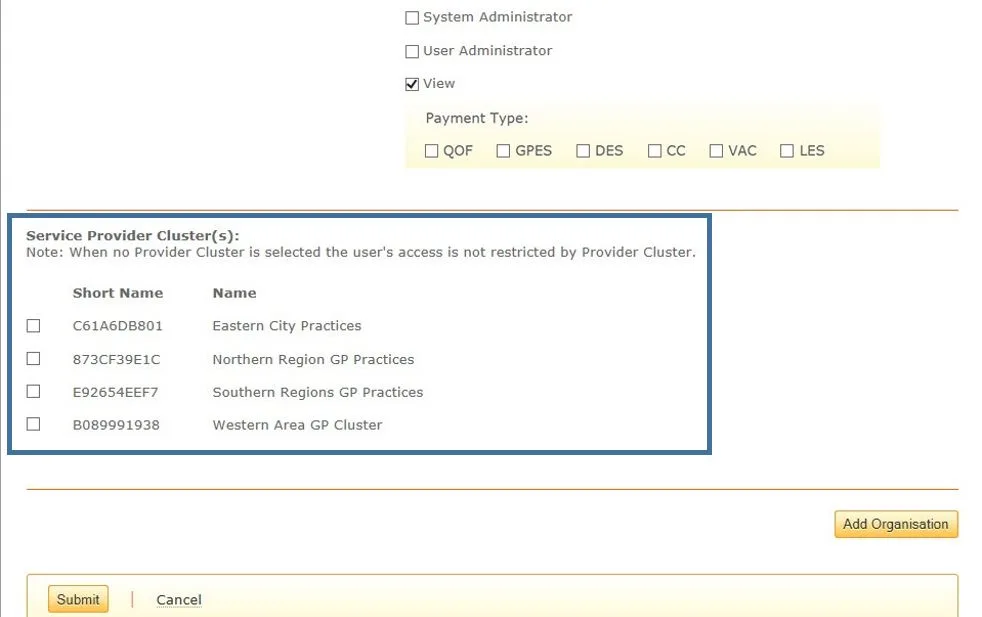
4. Click the checkbox for the cluster(s) you want to assign the user to.
5. Click the Submit button at the bottom of the page.
A confirmation indicates that the user was successfully updated.

Non-urgent advice: Need help?
If you need help with CQRS, you can log a call with the service desk. Please email: support@cqrs.co.uk or call 0330 124 4039.
Restricting user access using a Service Provider Cluster in CQRS National – video
Non-urgent advice: Need help?
If you need help with CQRS, you can log a call with the service desk. Please email: support@cqrs.co.uk or call 0330 124 4039.
Adding or removing allocated reports in CQRS National
Ordinarily, Descendant Organisations are not allowed to run reports for services commissioned by their Parent Organisations. However, using the Allocated Reports functionality Parent Organisations may give permission to selected Descendant Organisations to view specific report information.
This job aid is aimed at users within a Commissioning Organisation with the role of Organisation Administrator.
Note: The data that appears in this job aid is for training purposes only and does not represent actual data.
Adding Allocated Reports
- From the CQRS Home screen, select the Administrative Tasks tab, then select the Manage Org’s & Users sub-tab, and then select the Allocated Reports sub-tab.
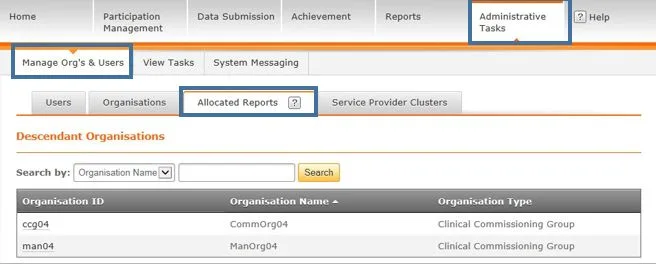
All Descendant Organisations are displayed. You may search for specific organisations using the Search by function.
2. Select the Descendant Organisation you wish to grant allocated report permissions to by clicking on the Organisation ID link.

3. Select one or more Quality Services to be allocated to the Descendant Organisation. To allocate all Quality Service, use the Select All checkbox.

NOTE: Quality Services can be filtered by Financial Year and/or Payment Type.
4. Select the Submit button.
5. A confirmation message will display at the top of the screen to indicate the allocations have been saved. Now when the Descendant Organisation runs a report for the selected service, information from the Parent Organisation’s commissioned services will be included.

Removing Allocated Reports
To remove reports from being allocated to an organisation, follow the same steps outlined above.
- From the CQRS Home screen, select the Administrative Tasks tab, then select the Manage Org’s & Users sub-tab, and then select the Allocated Reports sub-tab.
2. Select the Descendant Organisation.
3. Once on the Select Quality Service screen, the list of Quality Services will display with checkmarks beside the services allocated.
4. To remove the service from allocation, simply remove the checkbox beside the Quality Service.
5. Click the Submit button at the bottom of the page.
Non-urgent advice: Need help?
If you need help with CQRS, you can log a call with the service desk. Please email: support@cqrs.co.uk or call 0330 124 4039.
Adding or removing allocated reports in CQRS National – video
Non-urgent advice: Need help?
If you need help with CQRS, you can log a call with the service desk. Please email: support@cqrs.co.uk or call 0330 124 4039.
How to assign the PCN organisation Role within CQRS National
After CQRS has calculated each PCN’s Achievement Points and Achievement Payments for indicators extracted from GP systems, before payments can be made (i) PCNs must declare these data and calculations, and (ii) these declarations must receive commissioner and financial approval.
In order to enable timely declaration, please ensure you have two nominated persons within CQRS. Commissioners can give a CQRS user the power to make declarations on behalf of a PCN by assigning the PCN organisation role to them.
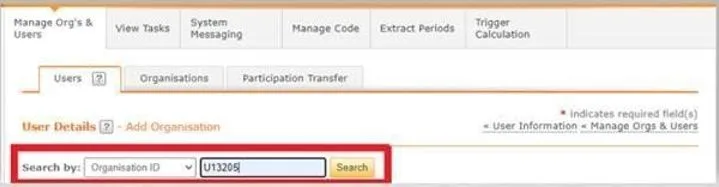
Commissioners can assign the PCN organisation role to a user within the Administrative Tasks and User Management tab. Please see the following steps on how to add the PCN to the nominated persons CQRS account:
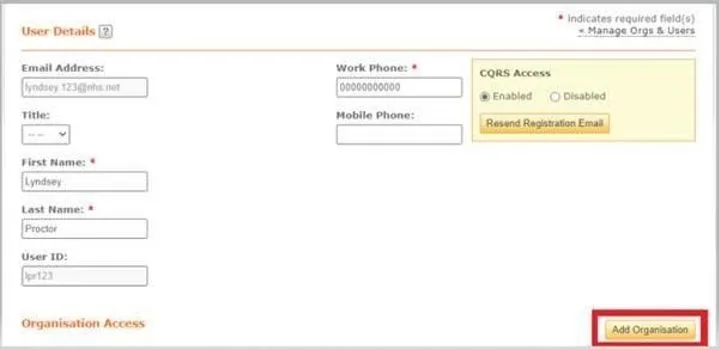
- Search for the user in CQRS and click into their account
- Click ‘add organisation’
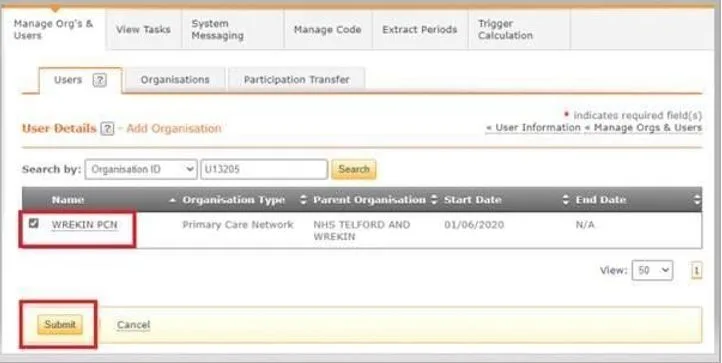
- Search by ‘organisation ID’ and enter the PCN code, click search
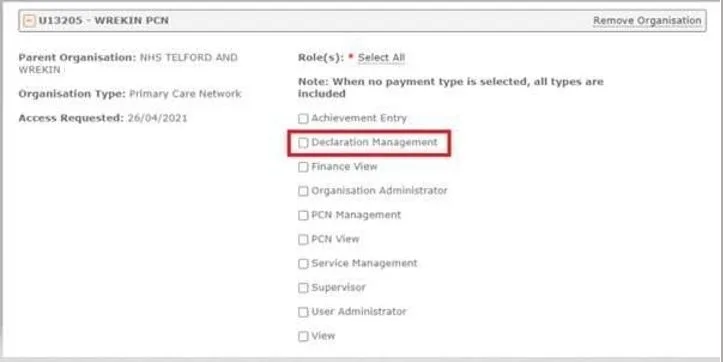
- Tick the check box for the PCN and click submit
- The nominated person will require the ‘declaration management’ permission to declare the achievement on behalf of the PCN
- Click submit at the bottom of the page

Non-urgent advice: Need help?
If you need help with CQRS, you can log a call with the service desk. Please email: support@cqrs.co.uk or call 0330 124 4039.
CQRS National Network Contract DES 21-22 Tick-Box Indicators
1. The overall payment value that you will approve is calculated after the data extracted from the GP Clinical system, via GPES is loaded into CQRS automatically.
2. The Commissioner and Financial Commissioners shall approve the outcomes of the full Network Contract Des 21/22 Service payment calculation including the tick-box indicator, which is allocated 220 points.
3. The following indicator is the tick-box indicator in the Network Contract Des 21/22 Service – COV-01 (NCD009)
4. The PCN user will see the tick-box indicator as follows:
You will then be able to use the drop-down to change this to a ‘Yes’ or ‘No’.

5. The GP Practice will see the tick-box indicator as follows:
As we can see, no action is required by the GP Practice for this indicator.

6. Please note that this indicator will default to ‘No’ if it is not actioned by the PCN ahead of the data being loaded into CQRS by the GP Clinical System, via GPES.
7. If the Commissioner has not financially approved the payment, the drop-down selection can still be updated by the Commissioner after the extract has taken place, and the calculated payment value will update.
8. If the PCN has not declared the payment, the tick-box can still be updated by the PCN lead after the extract has taken place and the calculated payment value will update.
9. If a ‘Yes’ value is submitted for the 28 February 2022 achievement date, then this will continue to be ‘Yes’ as part of the calculation that will use the 31 March 2022 achievement data, unless this drop-down is changed to ‘No’, prior to the declaration taking place as detailed above in points 6 and 7.
Non-urgent advice: Need help?
If you need help with CQRS, you can log a call with the service desk. Please email: support@cqrs.co.uk or call 0330 124 4039.
Declaring Indicators within a Service in CQRS National
Non-urgent advice: Need help?
If you need help with CQRS, you can log a call with the service desk. Please email: support@cqrs.co.uk or call 0330 124 4039.
Viewing and approving a final Achievement and Payment Declaration in CQRS National
At the end of each payment period, a provisional payment is calculated from the submitted achievement data. To be sure the payments are accurate, they are reviewed and agreed upon by the Service Provider and Commissioning Organisation before being paid.
Once approved and submitted by the Service Provider, you will receive a task notification on the Home screen of CQRS and by email (based on your notification preferences) that the achievement and payment declaration is available for approval or finance approval.
This job aid is aimed at Commissioning Organisations with the role of ‘Approval Management’ and/or ‘Finance Management’ who approve final achievement and payment declarations.
Note: The data that appears in this job aid is for training purposes only and does not represent actual data.
- From the CQRS Home screen, select the Achievement tab.
- Select the Declaration Management sub-tab.
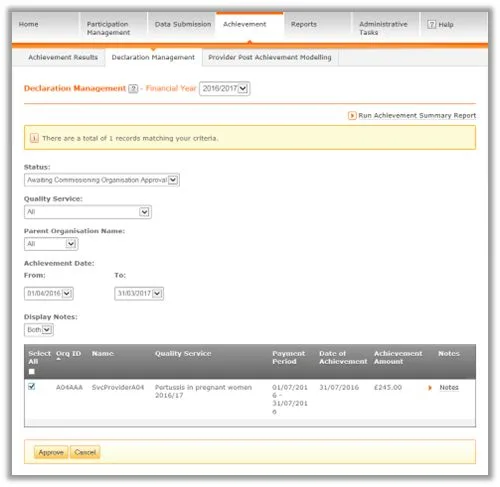
NOTE: If the Quality Service to be approved is not displayed, the Status and/or Quality Service filters can be used to manipulate which Quality Services are displayed.
3. Locate the required Quality Service and select the checkbox next to it. You may approve multiple achievements by selecting the relevant checkboxes or approve all the Quality Services by selecting the Select All checkbox.
4. Select the Approve button.
5. CQRS displays a confirmation message that the payment declaration has been successfully approved.
Non-urgent advice: Need help?
If you need help with CQRS, you can log a call with the service desk. Please email: support@cqrs.co.uk or call 0330 124 4039.
Viewing and approving a final Achievement and Payment Declaration in CQRS National – video
Non-urgent advice: Need help?
If you need help with CQRS, you can log a call with the service desk. Please email: support@cqrs.co.uk or call 0330 124 4039.
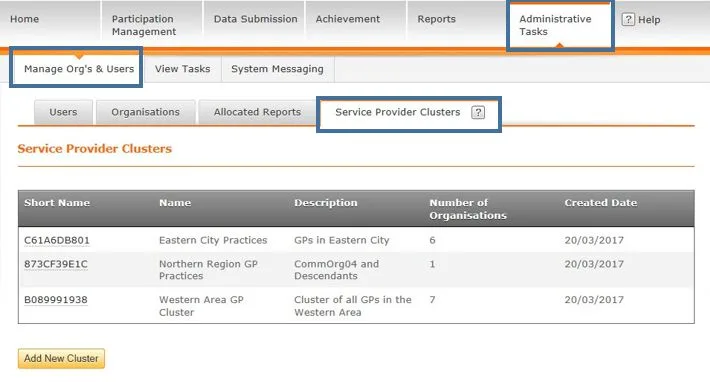
Creating a Service Provider Cluster in CQRS National
A user may be further restricted to specific organisations under a parent organisation through Service Provider Clusters. When a user is assigned to cluster, they may only access organisations listed in the cluster along with the organisations descendants if applicable.
This job aid is aimed at users within a Commissioning Organisation with the role of Organisation Administrator.
Note: The data that appears in this job aid is for training purposes only and does not represent actual data.
- From the CQRS Home screen, select the Administrative Tasks tab, then select the Manage Org’s & Users sub-tab, and then select the Service Provider Clusters sub-tab.
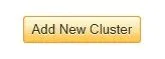
2. Click the Add New Cluster button at the bottom of the primary Service Provider Cluster screen.
3. On the Create Service Provider Cluster screen, enter a Name and Description for the Cluster. NOTE: Ensure the name is unique and descriptive for the cluster so it is easily recognised.
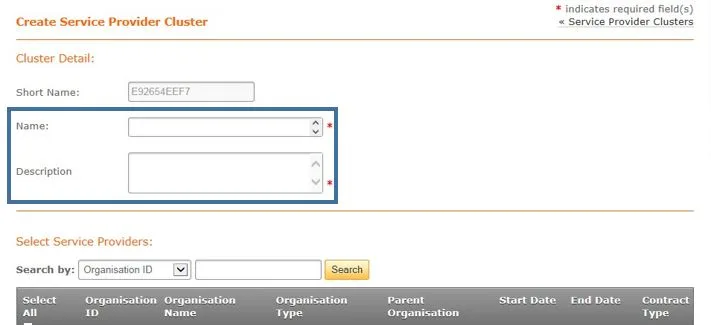
4. Add organisations to the cluster by selecting the organisation’s corresponding checkbox. You may select all organisations by using the Select All checkbox. To filter Service Providers, use the Search by function.
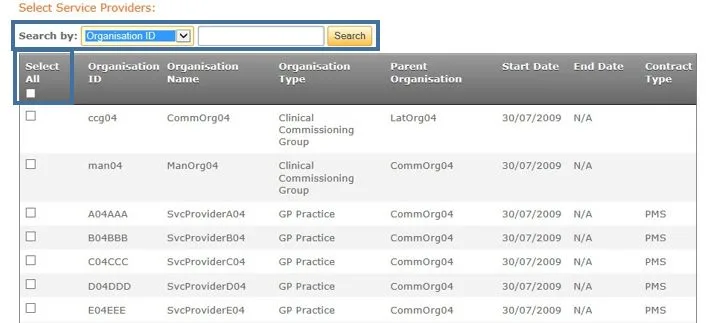
5. Once you have selected the Service Providers, click the Continue button on the bottom of the page.

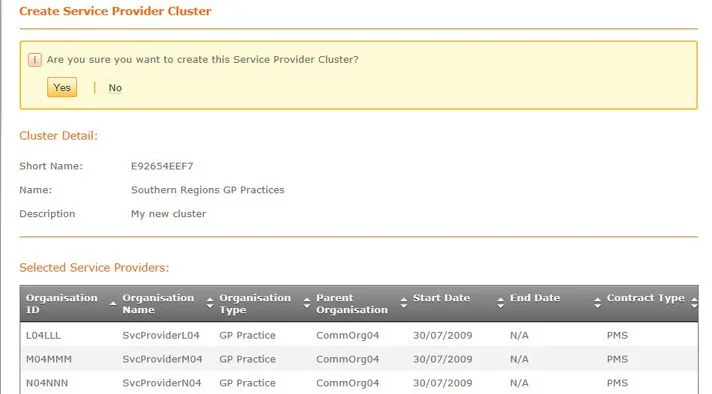
A summary screen will display listing the cluster details and the associated service providers.
6. Using the confirmation box at the top of the page, select Yes to create the service offer or No to return to the Create Service Provider Cluster page.
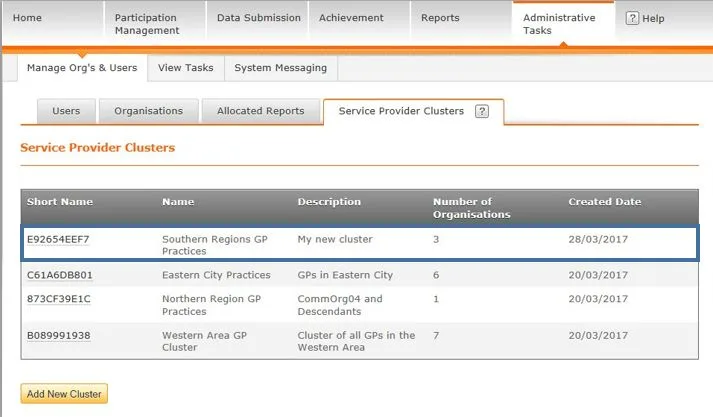
7. A final confirmation will display. Through the confirmation message, you may return to the primary Service Provider Cluster screen by clicking the View Service Provider Clusters link, or you may create another cluster by clicking the create a new Service Provider Cluster link.

8. When you return to the primary Service Provider Cluster screen, the new cluster will be listed.
Non-urgent advice: Need help?
If you need help with CQRS, you can log a call with the service desk. Please email: support@cqrs.co.uk or call 0330 124 4039.
Creating a Service Provider Cluster in CQRS National – video
Non-urgent advice: Need help?
If you need help with CQRS, you can log a call with the service desk. Please email: support@cqrs.co.uk or call 0330 124 4039.
Updating a Service Provider Cluster in CQRS National
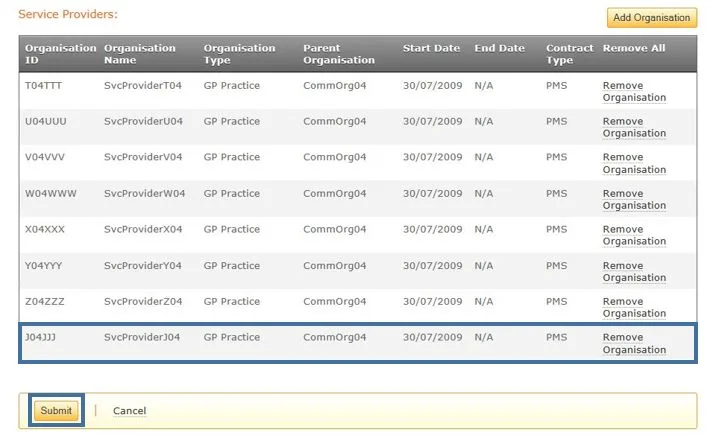
Once a Service Provider Cluster is created, you may add additional organisations to the cluster. This job aid will review the steps for that task.
This job aid is aimed at users within a Commissioning Organisation with the role of Organisation Administrator.
Note: The data that appears in this job aid is for training purposes only and does not represent actual data.
- From the CQRS Home screen, select the Administrative Tasks tab, then select the Manage Org’s & Users sub-tab, and then select the Service Provider Clusters sub-tab.

2. Click the Short Name of the Service Provider Cluster to update.

3. On the Service Provider Cluster screen, you may modify the Name and/or the Description for the Cluster. The Short Name is system-defined and cannot be updated.
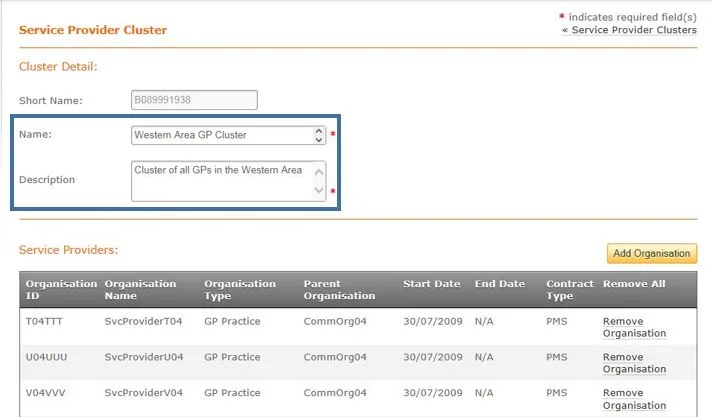
4. To add an organisation, click the Add Organisation button.
5. You may add an organisation to the cluster by selecting the organisation’s corresponding checkbox. You may select all organisations by using the Select All checkbox. To filter Service Providers, use the Search by function.
6. Once you have selected the Service Provider(s) to add to the cluster, click the Continue button on the bottom of the page.

Once the organisation(s) is added, you will be transferred back to the Cluster Detail screen. The newly added organisation(s) will be listed in the Service Providers section.
Click the Submit button to save your changes.
A confirmation message indicates the cluster was updated successfully.

Non-urgent advice: Need help?
If you need help with CQRS, you can log a call with the service desk. Please email: support@cqrs.co.uk or call 0330 124 4039.
Updating a Service Provider Cluster in CQRS National – video
Non-urgent advice: Need help?
If you need help with CQRS, you can log a call with the service desk. Please email: support@cqrs.co.uk or call 0330 124 4039.
Offering a Quality Service in CQRS National – video
Non-urgent advice: Need help?
If you need help with CQRS, you can log a call with the service desk. Please email: support@cqrs.co.uk or call 0330 124 4039.
Viewing Quality Services offered by status in CQRS National
Commissioning Organisations are able to use the Participation Management process to view the Quality Services that have been offered to or withdrawn / cancelled from the Service Providers, as well as Quality Services accepted or rejected by Service Providers. This job aid outlines the steps required to filter and view Quality Services by status.
This job aid is aimed at Commissioning Organisations with the role of ‘Commissioning Management’.
Note: The data that appears in this job aid is for training purposes only and does not represent actual data.
Viewing an Offered Quality Service
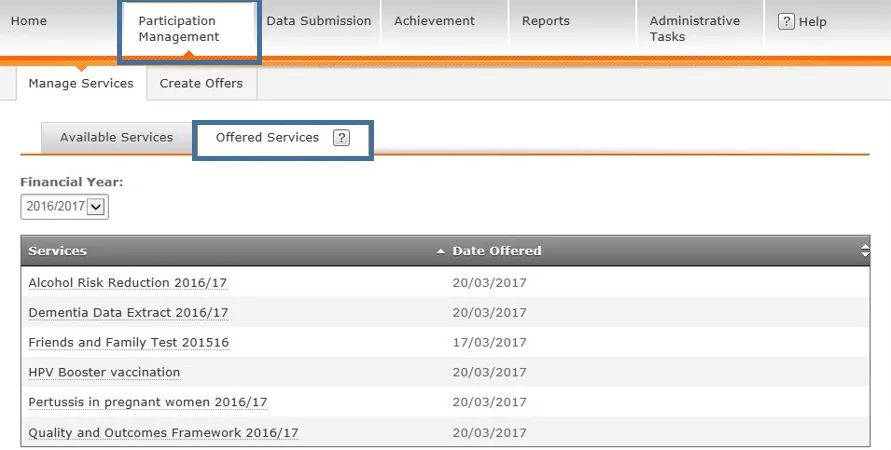
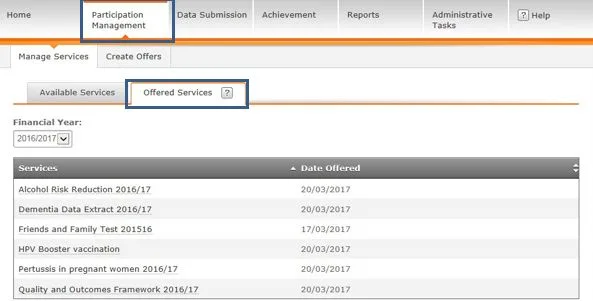
- From the CQRS Home screen, select the Participation Management tab and then select the Offered Services sub-tab
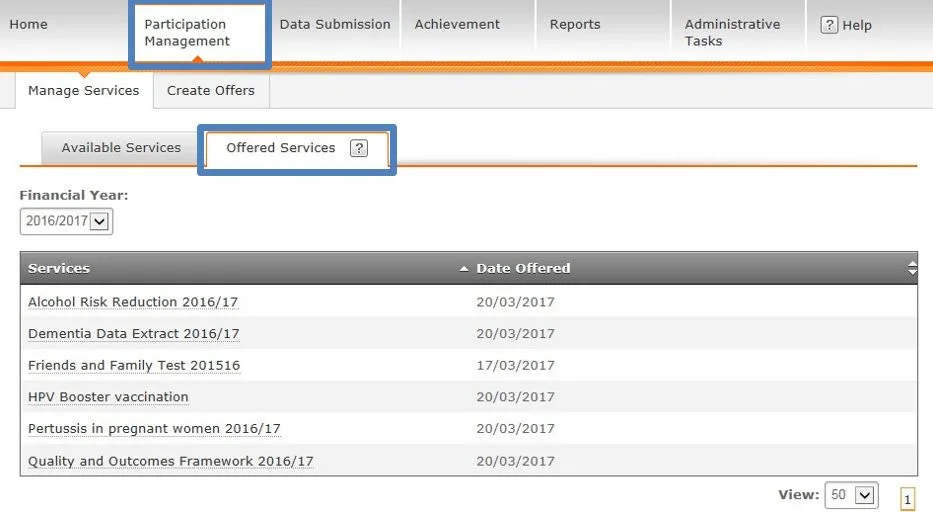
NOTE: Quality Services offered in the chosen financial year display by default. Using the Financial Year dropdown, you can filter these by financial year.
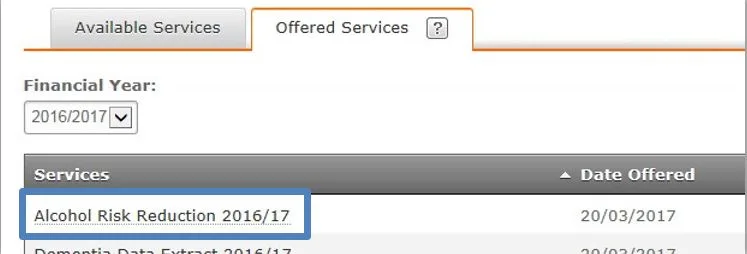
2. At this level it is not possible to view which Service Providers have been offered a Quality Service. This can only be achieved by drilling down into individual services. To do this, select the Services link of the Quality Service you wish to view.
3. In the Associated Service Providers panel, you can see which Service Providers have been offered the Quality Service.
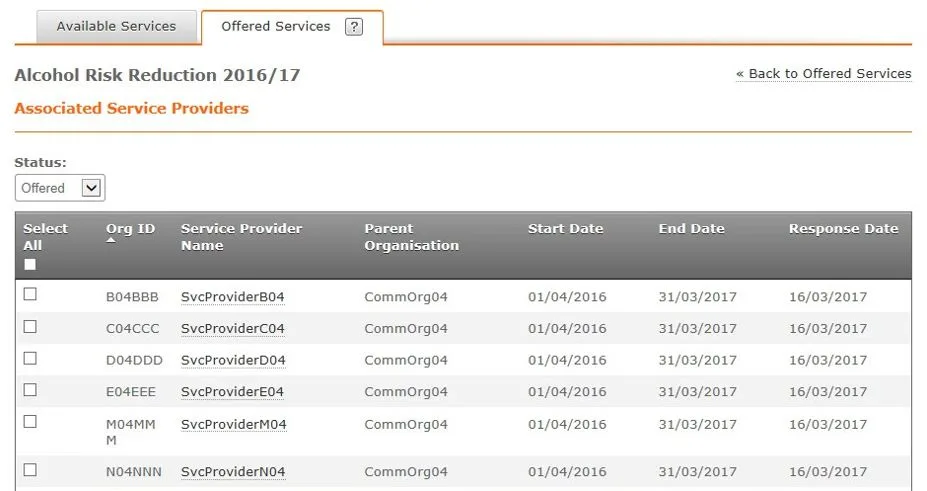
4. The Status dropdown allows you to filter the list of Quality Service offers by:
- Offered – Sent to the Service Provider by not yet Accepted or Rejected
- Approved – Accepted by the Service Provider and automatically placed in the status of Approved
- Rejected – The Service Provider has rejected the Quality Service Offer.
- Cancelled – Both Cancelled and Withdrawn offers will appear in this list.

Viewing Quality Services in which a Specific Service Provider is Participating
- From the Offered Service detail screen, you can drill down to review all Quality Services in which a specific Service Provider has been offered.
- Select the Service Provider Name link to view the details.
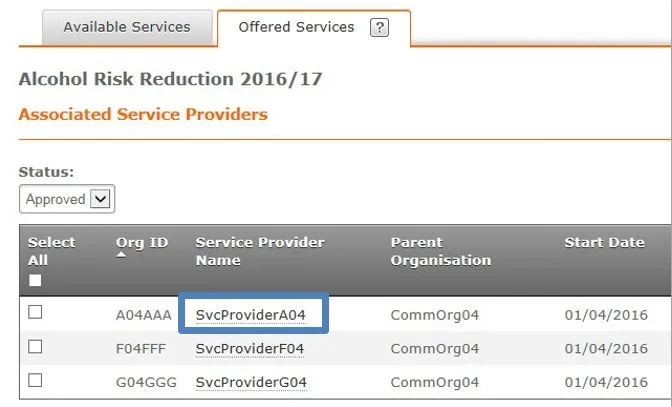
3. All Quality Services offered to the Service Provider display.
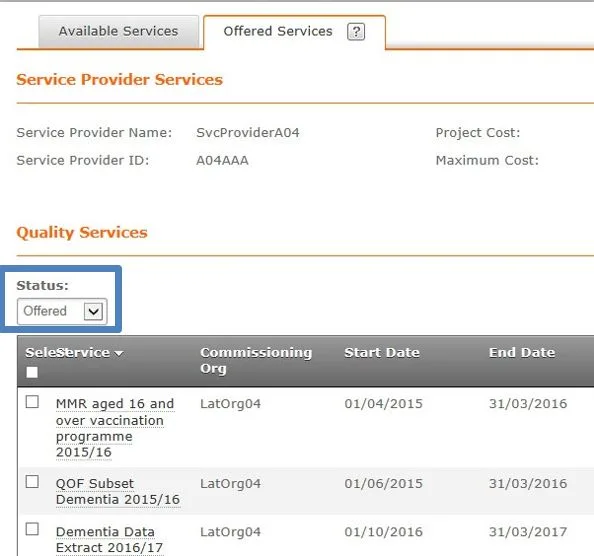
NOTE: As with the Quality Service detail screen, the Status dropdown allows you to filter the Quality Services in which this Service Provider has been offered:
- Offered – Sent to the Service Provider by not yet Accepted or Rejected.
- Approved – Accepted by the Service Provider and automatically placed in the status of Approved.
- Rejected – The Service Provider has rejected the Quality Service Offer.
- Cancelled – Both Cancelled and Withdrawn offers will appear in this list.
Non-urgent advice: Need help?
If you need help with CQRS, you can log a call with the service desk. Please email: support@cqrs.co.uk or call 0330 124 4039.
Viewing Quality Services offered by status in CQRS National – video
Non-urgent advice: Need help?
If you need help with CQRS, you can log a call with the service desk. Please email: support@cqrs.co.uk or call 0330 124 4039.
Cancelling a Quality Service in CQRS National
As a Commissioning Organisation, you have the ability to cancel Quality Services that have been accepted or rejected by Service Providers. This job aid outlines the basic steps required to perform this task.
This job aid is aimed at Commissioning Organisations with the role of ‘Commissioning Management’.
Note: The data that appears in this job aid is for training purposes only and does not represent actual data.
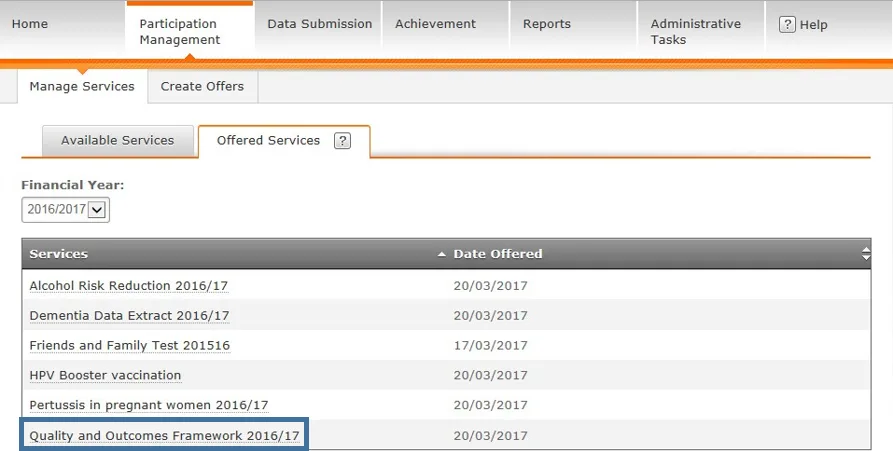
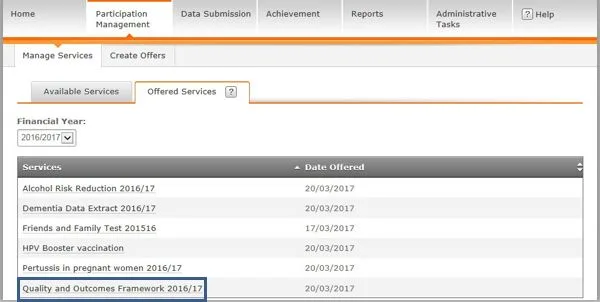
- From the CQRS Home screen, select the Participation Management tab and then select the Offered Services sub-tab.
NOTE: Offered Quality Services can be filtered by financial year. All Quality Services that have been offered in the current financial year display by default.
2. From the Offered Services list, select the link of the Quality Service you wish to cancel.
3. Select Approved or Rejected from the Status drop down menu to display the Service Providers who have Accepted or Rejected the offered service. Only services in these two statuses may be cancelled. Services which have been Offered cannot be cancelled but may be Withdrawn.

4. Locate the Service Provider(s) for whom you wish to cancel the Quality Service offer.
5. Select the checkbox adjacent to the Service Provider(s), and then select the Cancel Service button.
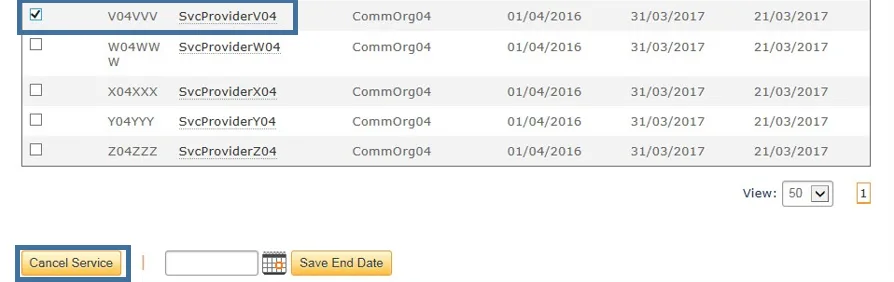
6. The confirmation message displays to make sure you want to cancel the Quality Service for the Service Provider(s). Select the Yes button.

An acceptance confirmation message displays, confirming that you have successfully cancelled the Quality Service. Note that selecting the Yes button will trigger a message that tells the Service Provider(s) that the Quality Service has been cancelled.

Non-urgent advice: Need help?
If you need help with CQRS, you can log a call with the service desk. Please email: support@cqrs.co.uk or call 0330 124 4039.
Cancelling a Quality Service in CQRS National – video
Non-urgent advice: Need help?
If you need help with CQRS, you can log a call with the service desk. Please email: support@cqrs.co.uk or call 0330 124 4039.
Withdrawing a Quality Service in CQRS National
As a Commissioning Organisation, you have the ability to withdraw Quality Services that have been offered to Service Providers. This job aid outlines the basic steps required to perform this task.
This job aid is aimed at Commissioning Organisations with the role of ‘Commissioning Management’.
Note: The data that appears in this job aid is for training purposes only and does not represent actual data.
- From the CQRS Home screen, select the Participation Management tab and then select the Offered Services sub-tab.
NOTE: Offered Quality Services can be filtered by financial year. All Quality Services that have been offered in the current financial year display by default.
2. From the Offered Services list, select the link of the Quality Service you wish to withdraw.
3. Select Offered from the Status drop down menu to display the Service Providers who have the offered service.
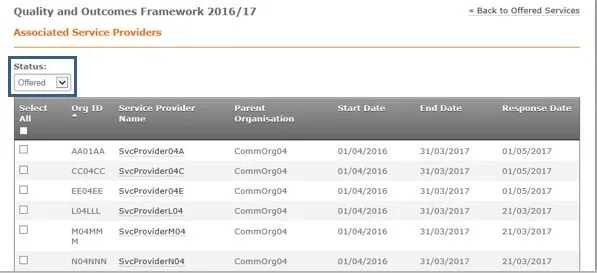
4. Locate the Service Provider(s) for whom you wish to withdraw the Quality Service offer.
5. Select the checkbox adjacent to the Service Provider(s), and then select the Withdraw Service button.
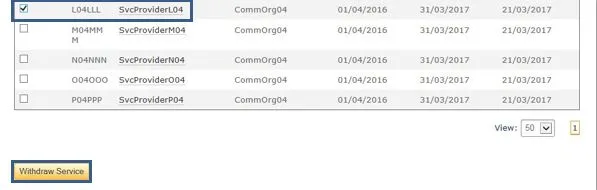
6. The confirmation message displays to make sure you want to withdraw the Quality Service for the Service Provider(s). Select the Yes button.

An acceptance confirmation message displays, confirming that you have successfully withdrawn the Quality Service. Note that selecting the Yes button will trigger a message that tells the Service Provider(s) that the Quality Service has been withdrawn.

NOTE: Once the offer has been withdrawn, it will appear under the Cancelled status. Select Cancelled from the Status drop down menu to display service offers both cancelled and withdrawn.
Non-urgent advice: Need help?
If you need help with CQRS, you can log a call with the service desk. Please email: support@cqrs.co.uk or call 0330 124 4039.
Withdrawing a Quality Service in CQRS National – video
Non-urgent advice: Need help?
If you need help with CQRS, you can log a call with the service desk. Please email: support@cqrs.co.uk or call 0330 124 4039.
Viewing, accepting and rejecting a Quality Service offered in CQRS National
Service Providers are alerted that a Quality Service offer has been made to them by the Message Centre on the CQRS Home screen. This job aid outlines how to view offered services and how to accept or reject them.
This job aid is aimed at Service Providers with the role of ‘Service Management’.
Note: The data that appears in this job aid is for training purposes only and does not represent actual data.
Viewing Offered Quality Services
- Offered Quality Services appear in your CQRS Message Centre as a new task.
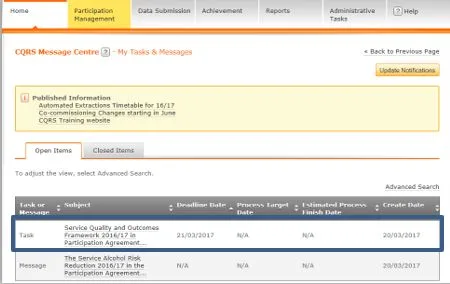
2. View the offered Quality Service by either selecting the Task Summary link or the Participation Management tab.
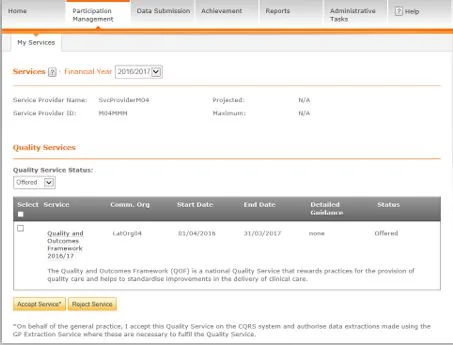
NOTE: By default, the My Services screen displays all offered Quality Services for the current financial year.
Although you can accept or reject the Quality Service by selecting the checkbox next to the service name and selecting either the Accept Service or Reject Service button, you should always view details of the Quality Service offer before deciding the appropriate course of action.
3. To view details of the offer, select it from the list of services by selecting the service name.
4. For the QOF, the top-level domains (Clinical, Organisational, Patient Experience and Additional Services) display as appropriate.
5. Each domain can be expanded and viewed by selecting the coloured arrows on the left.
6. Once you have reviewed the Quality Service details and are ready to accept or reject it, select the Back to Select a Quality Service link in the upper right of the screen.
7. The Service details screen displays again. Select the checkbox to the left of the Quality Service and then select either the Accept Service or Reject Service button.
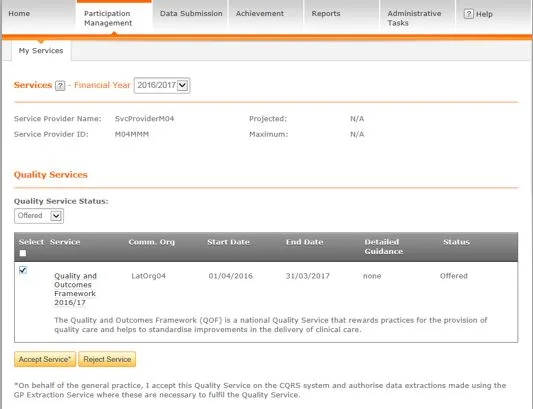
8. A confirmation message displays to make sure that you wish to accept or reject the selected service. Select the Yes button to confirm your selection.

9. CQRS displays a confirmation message that the Quality Service has been successfully accepted or rejected.

NOTE: If you reject the offer, the Commissioning Organisation will receive a message informing them of your action in regard to the offer. If you accept the offer, the offer is automatically moved into the “Approved” status and no additional notifications are sent to the Commissioning Service regarding the offer’s acceptance.
Non-urgent advice: Need help?
If you need help with CQRS, you can log a call with the service desk. Please email: support@cqrs.co.uk or call 0330 124 4039.
Viewing, accepting and rejecting a Quality Service offered in CQRS National – video
Non-urgent advice: Need help?
If you need help with CQRS, you can log a call with the service desk. Please email: support@cqrs.co.uk or call 0330 124 4039.
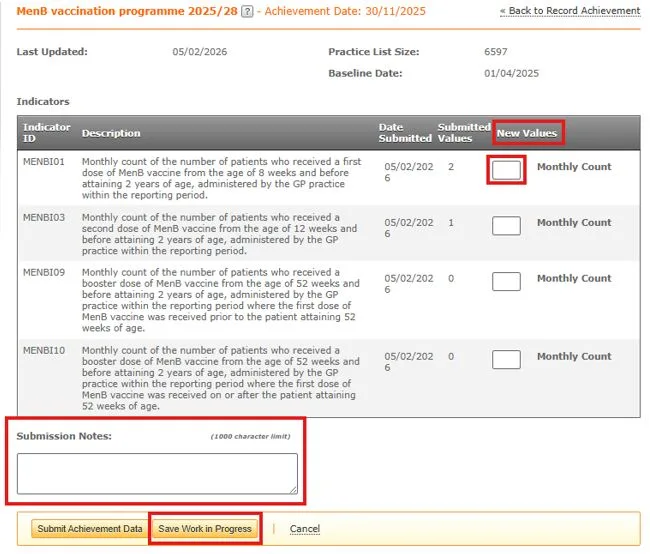
Adjusting manually submitted data in CQRS National
There may be occasions when the data submitted by a Service Provider during the Achievement declaration process may need to be updated. For example, data required for Quality and Productivity Indicators cannot be accessed from a GP system, and so may need to be manually adjusted throughout the financial year if the Service Provider’s situation or ability to meet required contractor obligations changes.
Manually submitted data can be adjusted by either a Service Provider or a Commissioning Organisation on its behalf.
Service Providers may update manually submitted data, providing:
- Achievement data has not been approved by a Commissioning Organisation
- Achievement data has been originally manually submitted and not received via automatic extraction
- The achievement date chosen to update manually submitted data falls within the permitted time to amend and submit data
- The achievement data has not been set as a Commissioning Organisation entry
Commissioning Organisations may adjust manually submitted data on behalf of a Service Provider, providing a payment declaration has not been financially approved.
This job aid is aimed at Service Providers and Commissioning Organisations with the role of ‘Achievement Entry’ who need to make these manual adjustments.
Note: The data that appears in this job aid is for training purposes only and does not represent actual data.
Steps to take when a Service Provider or Commissioning Organisation needs to adjust manually submitted data
- For both Service Providers and Commissioning Organisations, from the CQRS National Home screen, click the Data Submission tab.
2. For Commissioning Organisations, select the Service Provider Name link you wish to adjust manually submitted data for that appears under the Record Provider Achievement tab. Service Providers do not view this page and will continue their user action at step 3 below.
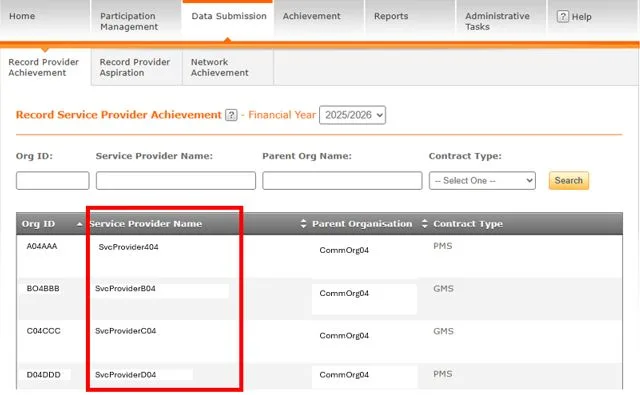
Note: The Record Service Provider Achievement page refreshes to display services specific to the selected Service Provider.
3. For both Service Providers and Commissioning Organisations, in the Quality Service drop-down, select the Quality Service to be adjusted
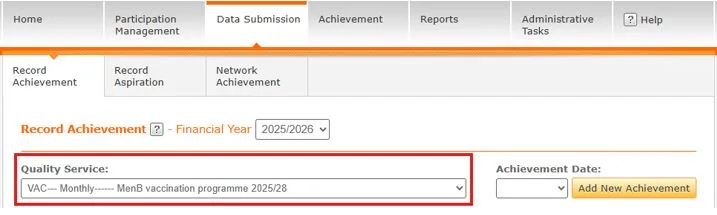
Note: The achievement panel below the selected Quality Service shows all achievements recorded against the chosen service.
4. Select the achievement date you wish to adjust.
Note: You can select the Achievement date to be adjusted by selecting the date in the Achievement Date table.
All sub-domains within the chosen service achievements are displayed, along with submitted and manually entered indicators.

5. Select the Indicator Group to be adjusted.
6. In the New Values field, enter the new achievement values.
Note: The available fields and values that can be adjusted will depend on the Quality Service and Indicator Group on view.
After making the necessary adjustments, you may enter submission notes specific to that submission in the Submission Notes field.
You can save the updated achievement data as work in progress without submitting the data and triggering calculations. Data is stored as work in progress if the data are different from the previous submission or if there was no previous submission.
You can submit the updated achievement data if the data are different from the previous submission or if there is no previous submission
7. Click the Submit Achievement Data button
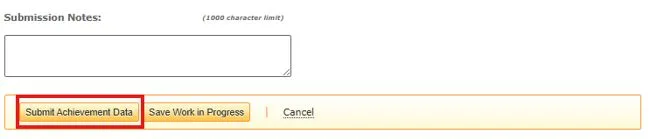
CQRS displays a confirmation message that the achievement data has been successfully submitted.

Note: In the case of a Commissioning Organisation adjusting manually submitted data on behalf of a Service Provider, CQRS will return the newly modified achievement to the Service Provider, where it will appear as a new task. The Service Provider must then process this through the Achievement Declaration process.
Non-urgent advice: Need help?
If you need help with CQRS, you can log a call with the service desk. Please email: support@cqrs.co.uk or call 0330 124 4039.
Offering a Quality Service in CQRS National
Offering a Quality Service to a Service Provider is a five step process. This job aid outlines each of those steps.
This job aid is aimed at Commissioning Organisations with the role of ‘Commissioning Management’.
Note: The data that appears in this job aid is for training purposes only and does not represent actual data.
Step 1: Select the Quality Service
- From the CQRS Home screen, select the Participation Management tab and then select the Create Offers sub-tab.
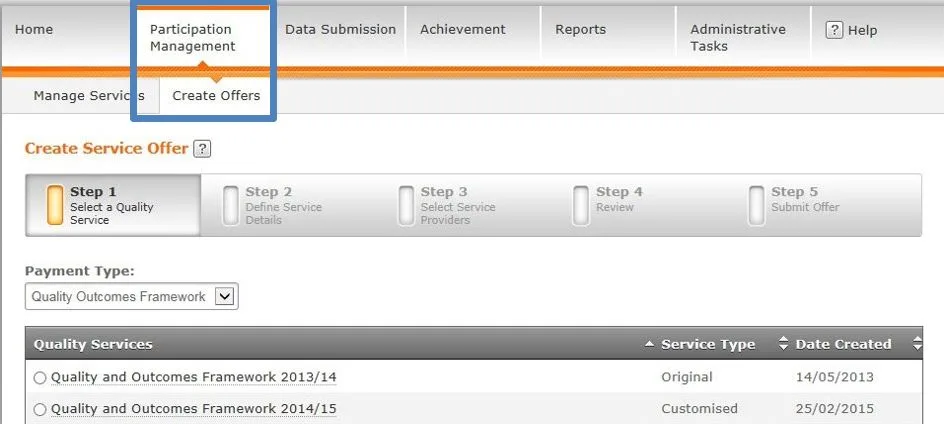
NOTE: Quality Services available to you and those that your organisation has customised display on the Quality Services commissioning panel. Selecting a Quality Service displays the details for the chosen Quality Service.
2. From the Payment Type dropdown, select the Service Type you wish to offer.
3. Select the radio button next to the Quality Service and then select the Continue button.

Step 2: Define Quality Service Details
4. In Step 2, you have the option of defining the Quality Service details and setting parameters such as Service Start, End, Response, and Target Dates.
5. Selecting the Help button on this screen lets you access the User Guide, which provides descriptions of these parameters.
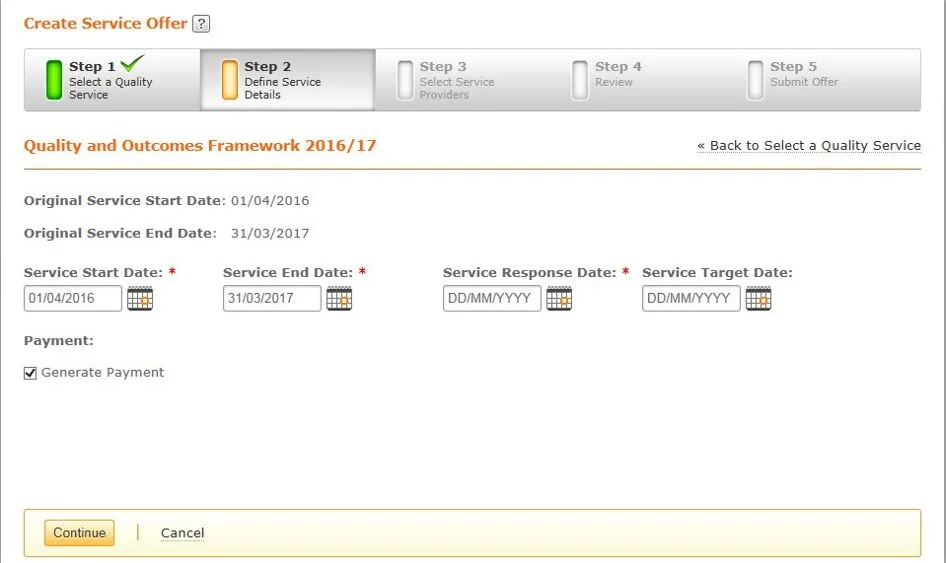
6. Enter or adjust your parameters and then select the Continue button.
NOTE: Adjustments to either the Service Start or End dates must remain within the original service’s Start and End date parameters.
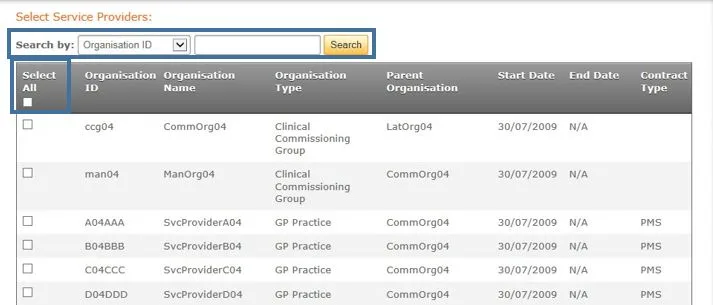
Step 3: Choose Service Provider(s)
7. Next, identify the Service Provider(s) to whom you wish to offer the Quality Service.
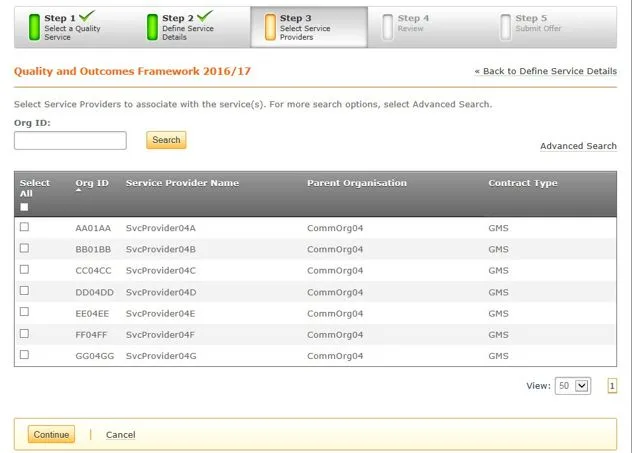
8. Select the checkbox next to each Service Provider to whom you wish to make the offer. If offering it to all Service Providers, select the Select All checkbox in the panel header.

9. Select the Save & Continue button.
Step 4: Review Offer
10. Next you have the opportunity to review details of the offer. Pay special attention to the details displayed on this screen, making sure that start, end, response and target dates are accurate and that the intended Service Providers are correct.

NOTE: If you wish to make any corrections, select the << Back to Select Service Providers link and make the desired changes. (You may also select a specific step from the steps listed at the top of the screen to return to a specific one).
11. When you are satisfied that the offer is correct, select the Submit button.
Step 5: Confirm Offer
12. Once submitted, a confirmation message displays to make sure that you wish to make the offer. Select the Yes button.
A confirmation message displays, stating that the Quality Service has been offered to the selected Service Provider(s).

Non-urgent advice: Need help?
If you need help with CQRS, you can log a call with the service desk. Please email: support@cqrs.co.uk or call 0330 124 4039.
Module 4: CQRS National Participation Management for Commissioning Organisations
Non-urgent advice: Need help?
If you need help with CQRS, you can log a call with the service desk. Please email: support@cqrs.co.uk or call 0330 124 4039.
Module 8: CQRS National How Commissioning Organisations Approve Achievements and Payments
Non-urgent advice: Need help?
If you need help with CQRS, you can log a call with the service desk. Please email: support@cqrs.co.uk or call 0330 124 4039.